Tracheostomy refers to the creation of a communication between the trachea and the overlying skin. This may be done either by open or percutaneous technique. This chapter will focus on the open surgical technique in the adult patient.
Tracheostomy is done for airway obstruction, respiratory support (assisted ventilation), pulmonary hygiene, elimination of dead space, and treatment of obstructive sleep apnoea.
Level of obstruction: A standard tracheostomy will not bypass obstruction in the distal trachea or bronchial tree
Anatomy of the neck: The surgeon should anticipate a difficult tracheostomy in patients with short necks, thick necks, and necks that cannot be extended due to e.g. rheumatoid or osteoarthritis of the cervical spine
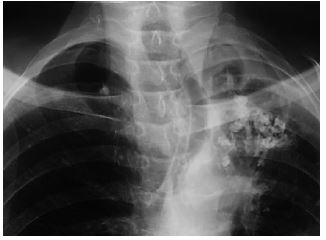
Deviation of cervical trachea: A chest X-ray will alert the surgeon to tracheal deviation due to cervical and mediastinal tumours, or traction on the trachea due to fibrosis (Figure 1).
Coagulopathy: A coagulopathy should be corrected prior to surgery. If not completely corrected, then have electrocoagulation available at surgery to aid haemostasis
Cardiorespiratory status: Patients with upper airway obstruction may have cor pulmonale, or respiratory acidosis. Some patients may be dependent on physiological PEEP to maintain O2 saturation, or an elevated pCO2 to maintain respiratory drive; relieving upper airway obstruction with a tracheostomy may paradoxically cause such patients to stop breathing and become hypoxic.
Laryngeal cancer: If airway obstruction is as a consequence of laryngeal cancer, then one should attempt not to enter the tumour during tracheostomy. This may require a lower tracheostomy if tumour involves the cervical trachea. It is prudent to send a sample from the tracheal window for histological examination as involvement by tumour might be useful information for the surgeon subsequently doing the laryngectomy.
A tracheostomy is best done in the operating room with good lighting, instrumentation, suction, and assistance. Patients may cough on inserting the tracheostomy tube; hence eye protection is recommended to prevent transmission of infections such as HIV and hepatitis.
Anaesthesia: Unless the patient can safely be intubated or the patient be ventilated with a mask, a tracheostomy should be done under local anaesthesia. If there is concern about the anaesthetist’s ability to maintain an airway, then the surgeon should be present during induction; the skin, soft tissue and trachea (into the lumen) should be infiltrated with local anaesthesia with adrenaline before induction; and a set of tracheostomy instruments should be set out before induction of anaesthesia so that an emergency tracheostomy can be done if required.
Positioning and draping: The patient is placed in a supine position with neck extended by a pillow or sandbag placed under the shoulders in order to deliver the trachea out of the thorax and to give the surgeon adequate access to the cervical trachea. Such extension may not be possible in patients with neck injuries, or rheumatoid and osteoarthritis of the cervical spine. Some patients with impending air-way obstruction may not tolerate a recumbent position; the tracheotomy may then be done with the patient in a sitting position with neck extended. The skin of the anterior neck and chest is sterilised and the neck draped. If the tracheostomy is being done under local anaesthesia, the face should not be covered.
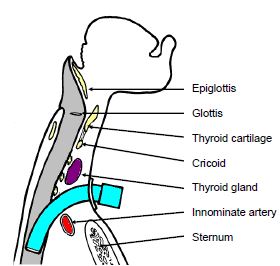
Surface landmarks: The tracheostomy is created below the 1st tracheal ring, so as to avoid subglottic stenosis as a result of scarring. Therefore palpating to determine the location of the cricoid cartilage is important. When you run your fingers up the midline of the neck starting inferiorly at the sternal notch, you 1st encounter prominence of the thyroid isthmus, followed by the cricoid.
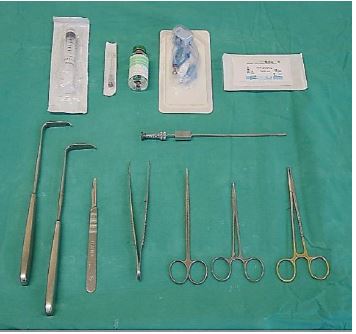
Minimum instruments: A minimum set of instruments is demonstrated in Figure 2.
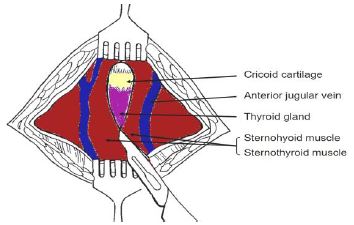
Skin incision: A horizontal incision is made one fingerbreadth below the cricoid prominence. This is cosmetically preferable to a vertical midline incision. The incision is carried through the skin and the subcutaneous tissue. Note that the platysma is generally absent in the midline. Take care not to transect the anterior jugular veins, which are just superficial to the strap muscles within the investing cervical fascia, and can be preserved and retracted laterally (Figure 3).
The remainder of the dissection should remain strictly in the midline in a vertical plane to avoid injury to the inferior thyroid veins.
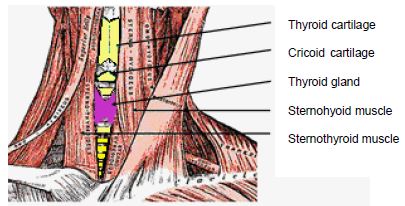
Infrahyoid strap muscles: Figure 4 illustrates the infrahyoid strap muscles. Identify the midline cervical fascial plane between the sternohyoid muscles. Divide this intermuscular plane by spreading with a pair of scissors. Repeat this manoeuvre to separate the sternothyroid muscles, and retract the muscles laterally (Figure 5). The trachea and cricoid can now be palpated.
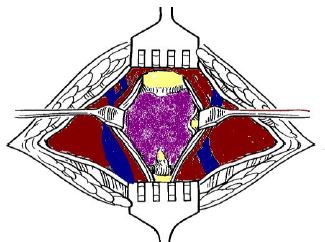
Thyroid isthmus: The thyroid isthmus overlies the 2nd/3rd tracheal rings. The isthmus should be retracted superiorly to expose the trachea (Figure 6). Only very rarely does the thyroid isthmus need to be doubly clamped, divided, and (suture) ligated.

Expose trachea: The infrathyroid trachea is exposed anteriorly by carefully parting overlying soft tissues with a pair of scissors, taking care not to tear the inferior thyroid veins. Ensure that the surgical field is dry before proceeding, as it is difficult to achieve haemostasis once the tracheostomy tube has been inserted. Should there be doubt about the location of the trachea, or there be concern it being confused with the carotid artery, aspirating air with a needle attached to a syringe will confirm its location.
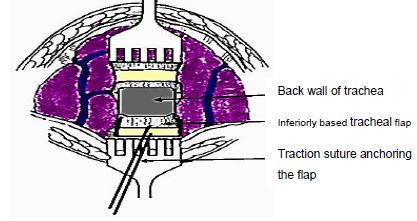
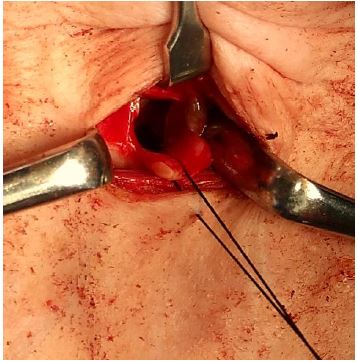
Create tracheostoma: In the wake patient, lignocaine may again be injected into tracheal lumen prior to incising the trachea and inserting the tube in order to reduce coughing. Upward traction may be applied to a tracheal hook inserted under a tracheal ring to stabilise the trachea and deliver it from the chest. The safest means to create a tracheostomy in adults is by creating an inferiorly based flap raised from the anterior wall of the 3rd and 4th tracheal rings. A silk traction suture is passed through this anterior tracheal flap and loosely secured to the skin (Figure 7). Traction on the suture facilitates reinsertion of the tracheostomy tube in case of accidental decannulation. Alternately one may remove an anterior cartilage segment of the 2nd, 3rd or 4th tracheal rings.
Insertion of tracheostomy tube: The surgeon assesses the size of the trachea, and selects the largest sized cuffed tracheostomy tube that will comfortably fit the tracheal lumen. Inject air into the tracheostomy inflatable cuff to test the integrity of the cuff. Insert the introducer into the tracheostomy tube. If the patient has been intubated, the anaesthetist is asked to slowly withdraw the endotracheal tube, so that the tracheostomy tube can be inserted under direct vision. Advance the tube into the trachea while applying traction to the silk traction suture attached to the tracheal flap. Ensure that the tube has been inserted into the tracheal lumen, and not a false passage in the paratrcheal soft tissues. Inflate the cuff, attach the anaesthetic tubing, and hand-ventilate until one has confirmed correct placement of the tube within the trachea (Figure 8). Do not suture the skin tightly around the tracheostomy tube, as this can promote surgical emphysema.
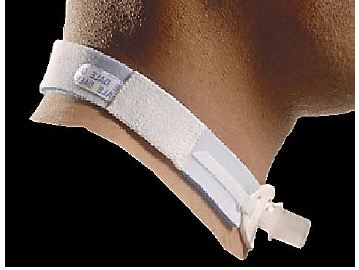
Securing the tracheostomy tube: Tapes are threaded through the holes in the flanges of the tracheostomy tube and passed around the neck and tied with the neck flexed.
If the ties are placed with the neck extended, they are too loose when the patient flexes the neck. The ties should be tight enough to admit no more than a single finger under the tape (Figure 9).
High tracheostomy: It is important not to place the tracheotomy above the 2nd tracheal ring, as inflammation may cause subglottic oedema, chondritis of the cricoid cartilage, and subglottic stenosis.
Low tracheostomy: A tracheotomy should not be placed below the 4th tracheal ring as:
Paratracheal false tract: Inadvertent extratracheal placement of the tracheostomy tube can be fatal. It is recognised by the absence of breath sounds on auscultation of the lungs, high ventilatory pressures, failure to ventilate the lungs, hypoxia, absence of expired CO2, surgical emphysema, and an inability to pass a suction catheter down the bronchial tree, and on chest X-ray.
Surgical emphysema, pneumomediastinum, and pneumothorax: Injury to the pleural domes is more likely to occur in children, struggling patients and patients on positive pressure ventilation. It can be complicated by a tension pneumothorax. Hence auscultation of the chest and a CXR should be performed after tracheostomy, especially in ventilated patients. Surgical emphysema may also be promoted by suturing the tracheostomy wound around the tracheostomy tube.
Airway fire: Do not enter the trachea with diathermy, as this may cause an airway fire in a patient being ventilated with a high concentration of oxygen.
A variety of tube designs and materials are available. The choice of tube should conform to the indication for which it is to be used. All tubes should have an inner cannula; this can safely be removed and cleaned without a need to remove the outer cannula and hence endanger the airway. The following factors may influence the choice of tube:
Tube diameter: Because airway resistance is related to the 4th power of the radius with laminar flow, and the 5th power of the radius with turbulent flow, it is important to select a tube that that fits the trachea snugly. A range of sizes should be available. It also underscores the importance of keeping the tube clean, as accumulation of mucus increases airway resistance not only by reducing the diameter, but also by causing turbulent air flow.
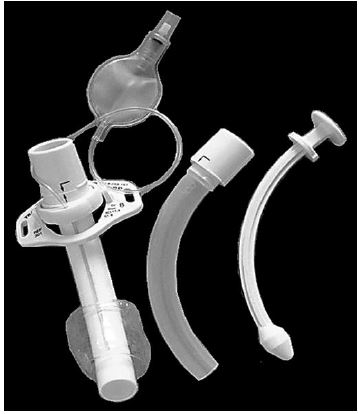
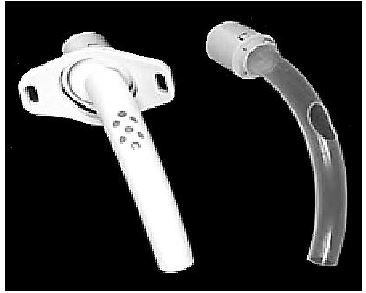
Tracheal seal: A cuffed, plastic tracheostomy tube is used to create a seal with the trachea in patients on positive pressure ventilation, and with fresh tracheostomy wounds (Figure 10) to prevent saliva or blood entering the lower airways. The cuffed tube may be replaced with an uncuffed tube, either plastic or metal (Figure 11) in patients who do not require positive pressure ventilation once the tract between the skin and the trachea has become well defined by granulation tissue at 48hrs, and tracheostomal bleeding has settled.
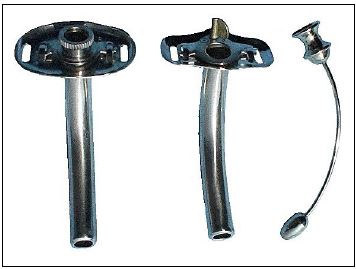
Tube material: Metal tubes are thinner walled, and hence have a better ratio of outer to inner wall diameter, thereby optimising airway resistance (Figure 11).
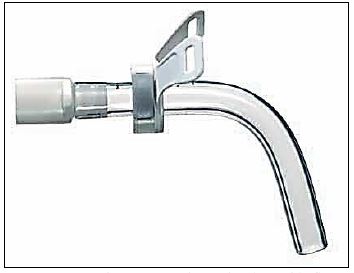
Tube length: Patients with very thick necks can be fitted with a tracheostomy tube with a flange that can be adjusted up or down the shaft of the tube (Figure 12). Tube length may also need to be adjusted when the carina is close to the tracheostoma or with tracheal stenosis or tracheamalacia distal to the tracheostoma that needs to stented by the tube. Chest and neck X-rays are of value to determine the required length.
Tube shape: Laryngectomy patients require shorter tubes with a gentler curvature to conform to the stoma and the trachea.
Neck Flange: The neck flange should conform to the shape of the neck and fit snugly against the skin to avoid excessive tube movement, accidental decannulation, and soft tissue trauma.
Phonation: Patients with uncuffed tubes or fenestrated tubes (Figure 13) can phonate by occluding the end of the tracheostomy tube with a finger which permits air to bypass the tube and to pass through the larynx.
Speaking valves fitted to the ends of tracheostomy tubes are one-way valves that open on inspiration, but close on expiration, thereby directing expired air through the larynx and permit hands-free speech (Figure 14).
Fenestrated tubes with speaking valves are particularly well suited to patients with obstructive sleep apnoea, as they can have normal speech by day with the valve in place, but uncap the tracheostomy tube at night to ensure unobstructed breathing.
Pulmonary oedema: This may occur following sudden relief of airway obstruction and reduction in high intraluminal airway pressures. It may be corrected by CPAP or positive pressure ventilation.
Respiratory arrest: This may occur immediately following insertion of the tracheostomy tube, and is attributed to the rapid reduction in arterial pCO2 following restoration of normal ventilation, and hence loss of respiratory drive.
Humidification: Tracheostomy bypasses the nose and upper aerodigestive tract which normally warms, filters, and humidifies inspired air. To avoid tracheal desiccation and damage to the respiratory cilia and epithelium, and obstruction due to mucous crusting, the tracheostomy patient needs to breathe humidified warm air by means of a humidifier, heat and moisture exchange filter, or a tracheostomy bib.
Pulmonary Toilette: The presence of a tracheostomy tube and inspiration of dry air irritates the mucosa and increases secretions. Tracheostomy also promotes aspiration of saliva and food as tethering of the airway prevents elevation of the larynx during swallowing. Patients are unable to clear secretions as effectively as tracheostomy prevents generation of subglottic pressure, hence making coughing and clearing secretions ineffective; it also disturbs ciliary function. Therefore secretions need to be suctioned in an aseptic and atraumatic manner.
Cleaning the tube: Airway resistance is related to the 4th power of the radius with laminar flow, and the 5th power of the radius with turbulent flow. Therefore even a small reduction of airway diameter and/or conversion to turbulent airflow as a result of secretions in the tube can significantly affect airway resistance. Therefore regular cleaning of the inner cannula is required using a pipe cleaner or brush.
Securing the tube: Accidental decannulation and failure to quickly reinsert the tube may be fatal. This is especially problematic during the 1st 48hrs when the tracheocutaneous tract has not matured and attempted reinsertion of the tube may be complicated by the tube entering a false tract. Therefore the tightness of the tracheostomy tapes should be regularly checked. Traction sutures on the tracheal flap facilitate reinsertion of the tracheotomy tube.
Cuff pressures: When tracheostomy tube cuff pressures against the tracheal wall mucosa exceed 30cm H20, mucosal capillary perfusion ceases, ischaemic damage ensues and tracheal stenosis may result. Mucosal injury has been shown to occur within 15 minutes. Therefore cuff inflation pressures of >25cm H20 should be avoided. A number of studies have demonstrated the inadequacy of manual palpation of the pilot balloon as a means to estimate appropriate cuff pressures. Measures to prevent cuff related injury include:
The tracheostomy tube can be removed once the cause of the airway obstruction has been resolved. If any doubt exists about the adequacy of the airway, e.g. following pharyngeal or laryngeal surgery, then the tracheostomy tube is first downsized and plugged, so that the patient can breathe freely past the tube. The tube is then plugged. The patient should be under close observation during this time, and may be monitored with pulse oximetry. If the patient can tolerate the tracheostomy tube being plugged overnight, it can then be removed. The tracheostomy wound is covered with an occlusive dressing, and generally heals over a matter a week.
Percutaneous dilational tracheostomy surgical technique
Paediatric tracheostomy
Johan Fagan MBChB, FCORL, MMedAuthor & Editor
Professor and Chairman
Division of Otolaryngology
University of Cape Town
Cape Town, South Africa
johannes.fagan@uct.ac.za