Percutaneous tracheostomy is a bedside procedure requiring a small surgical field and avoiding the need for an operating room. It was popularised in the 1990’s as a minimally invasive technique requiring only a small skin incision. The widespread adoption of percutaneous techniques is in the opinion of the authors due to the possibility it gives ICU physicians to immediately perform a percutaneous tracheostomy for ventilation purposes once the need for tracheostomy has been identified, with its organisational and cost advantages.
Typically percutaneous tracheostomy is done by ICU physicians, although it should only be employed if a surgeon experienced with classic open tracheostomy and with coping with complications such as bleeding is immediately available to help.
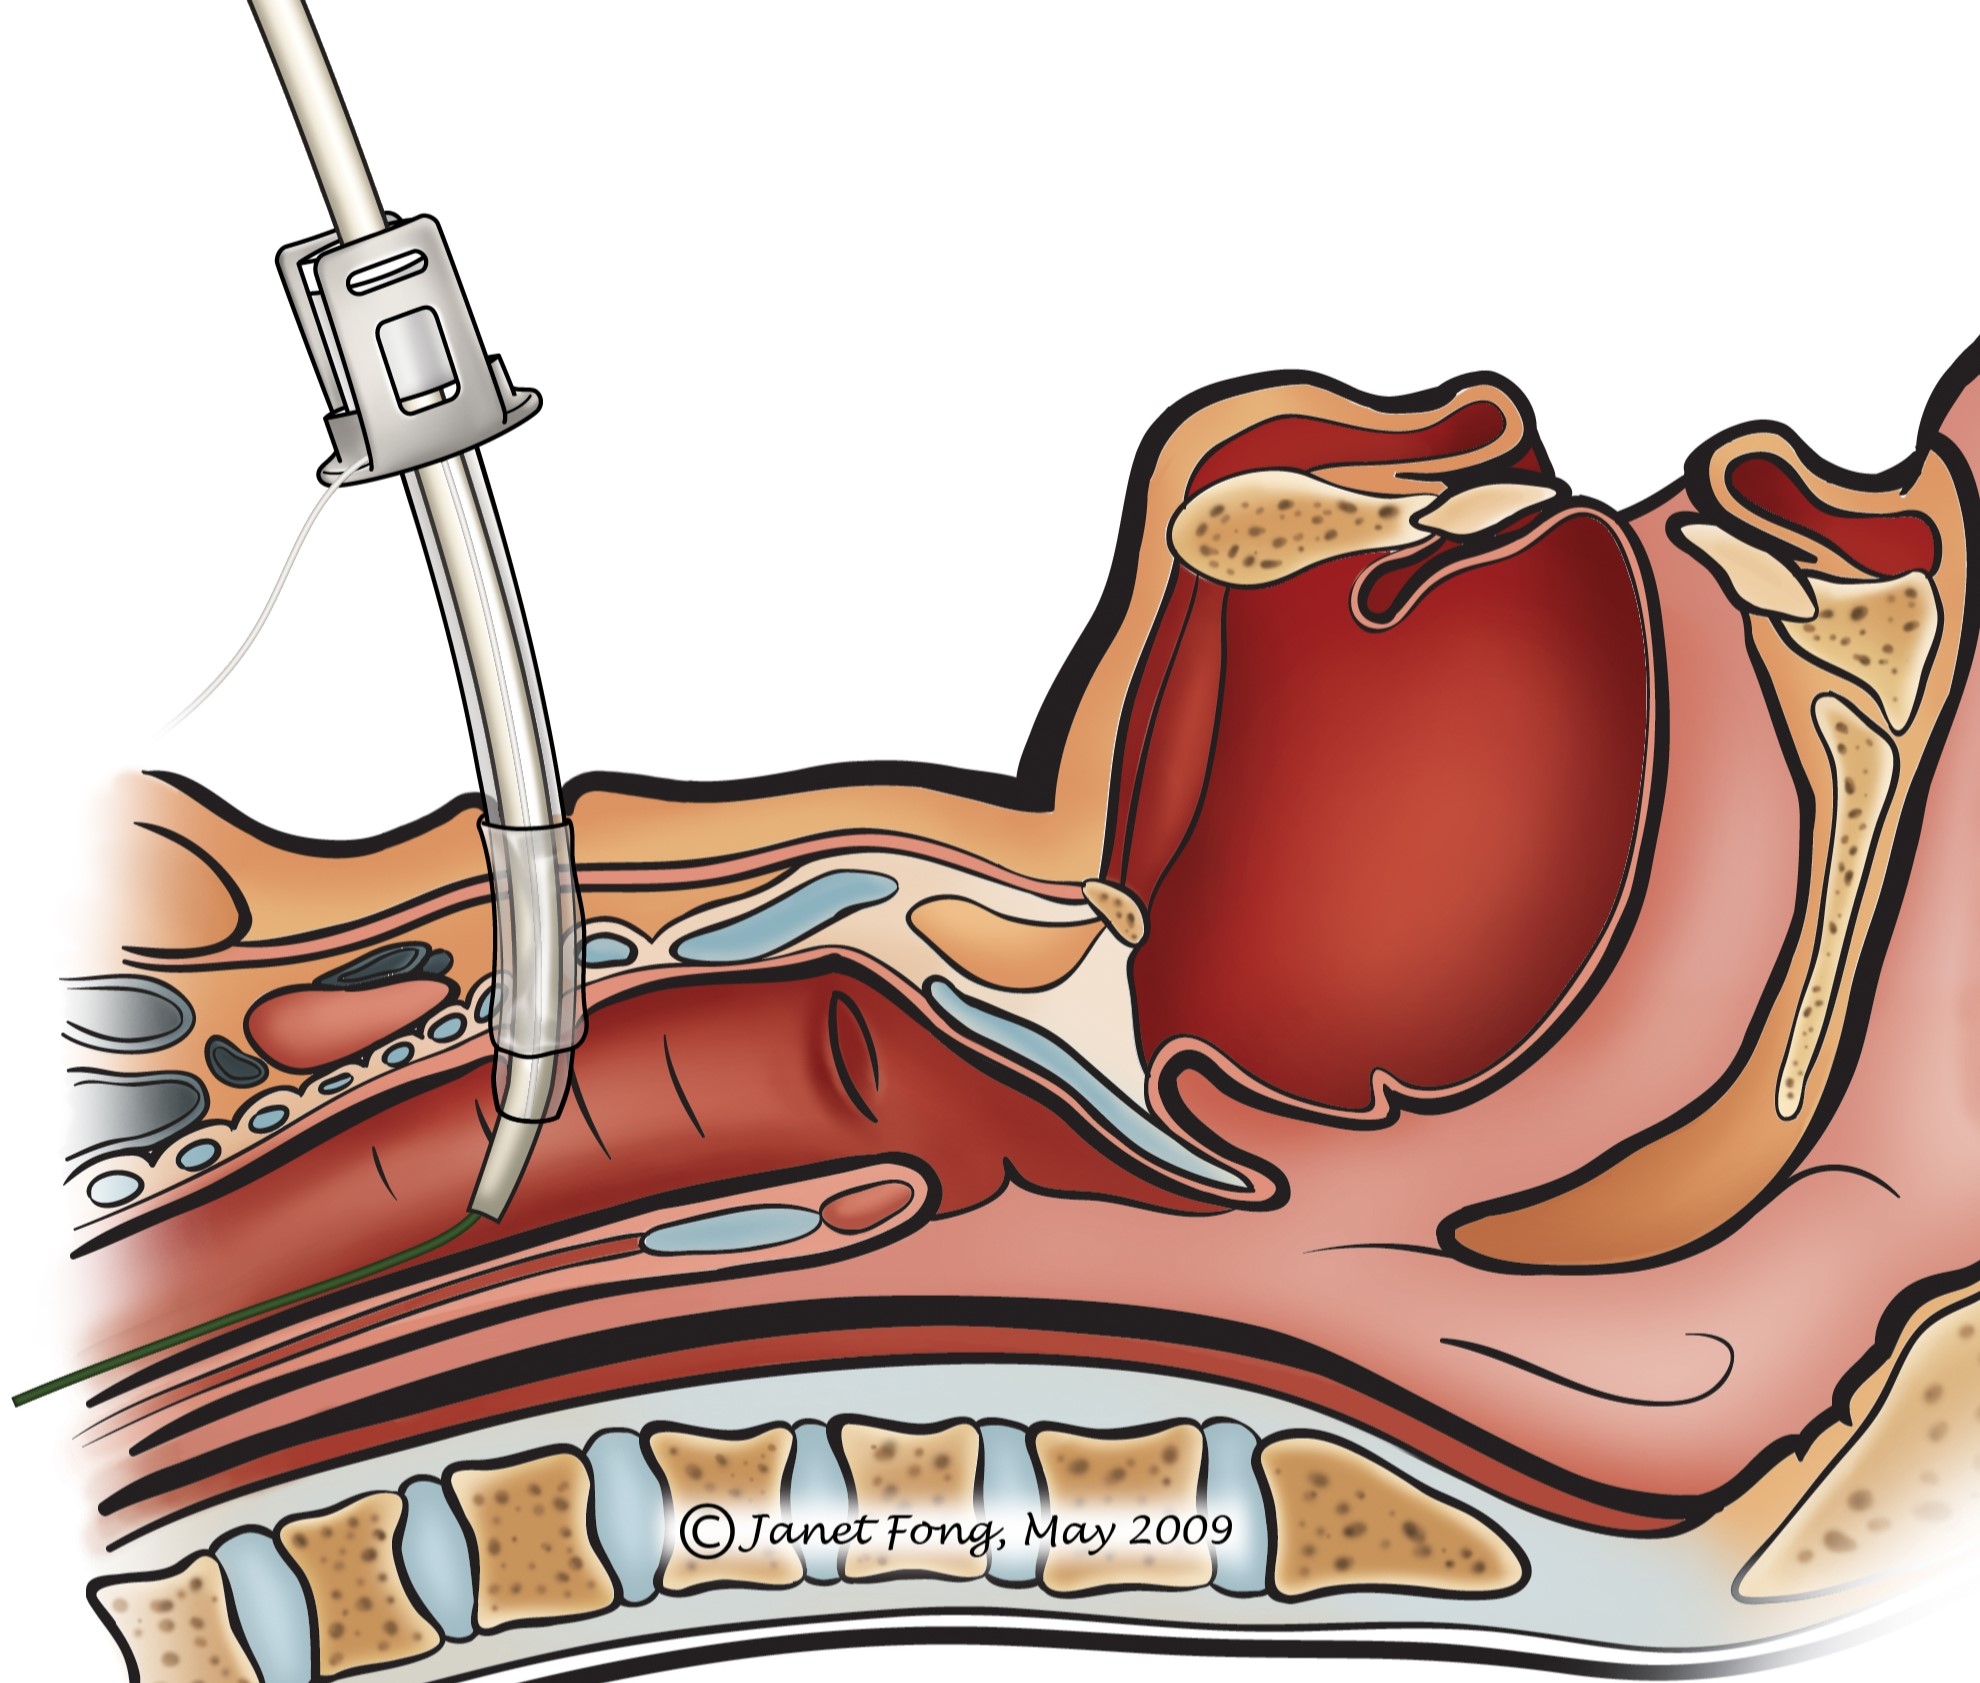
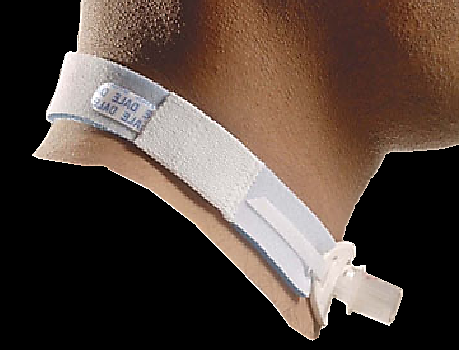
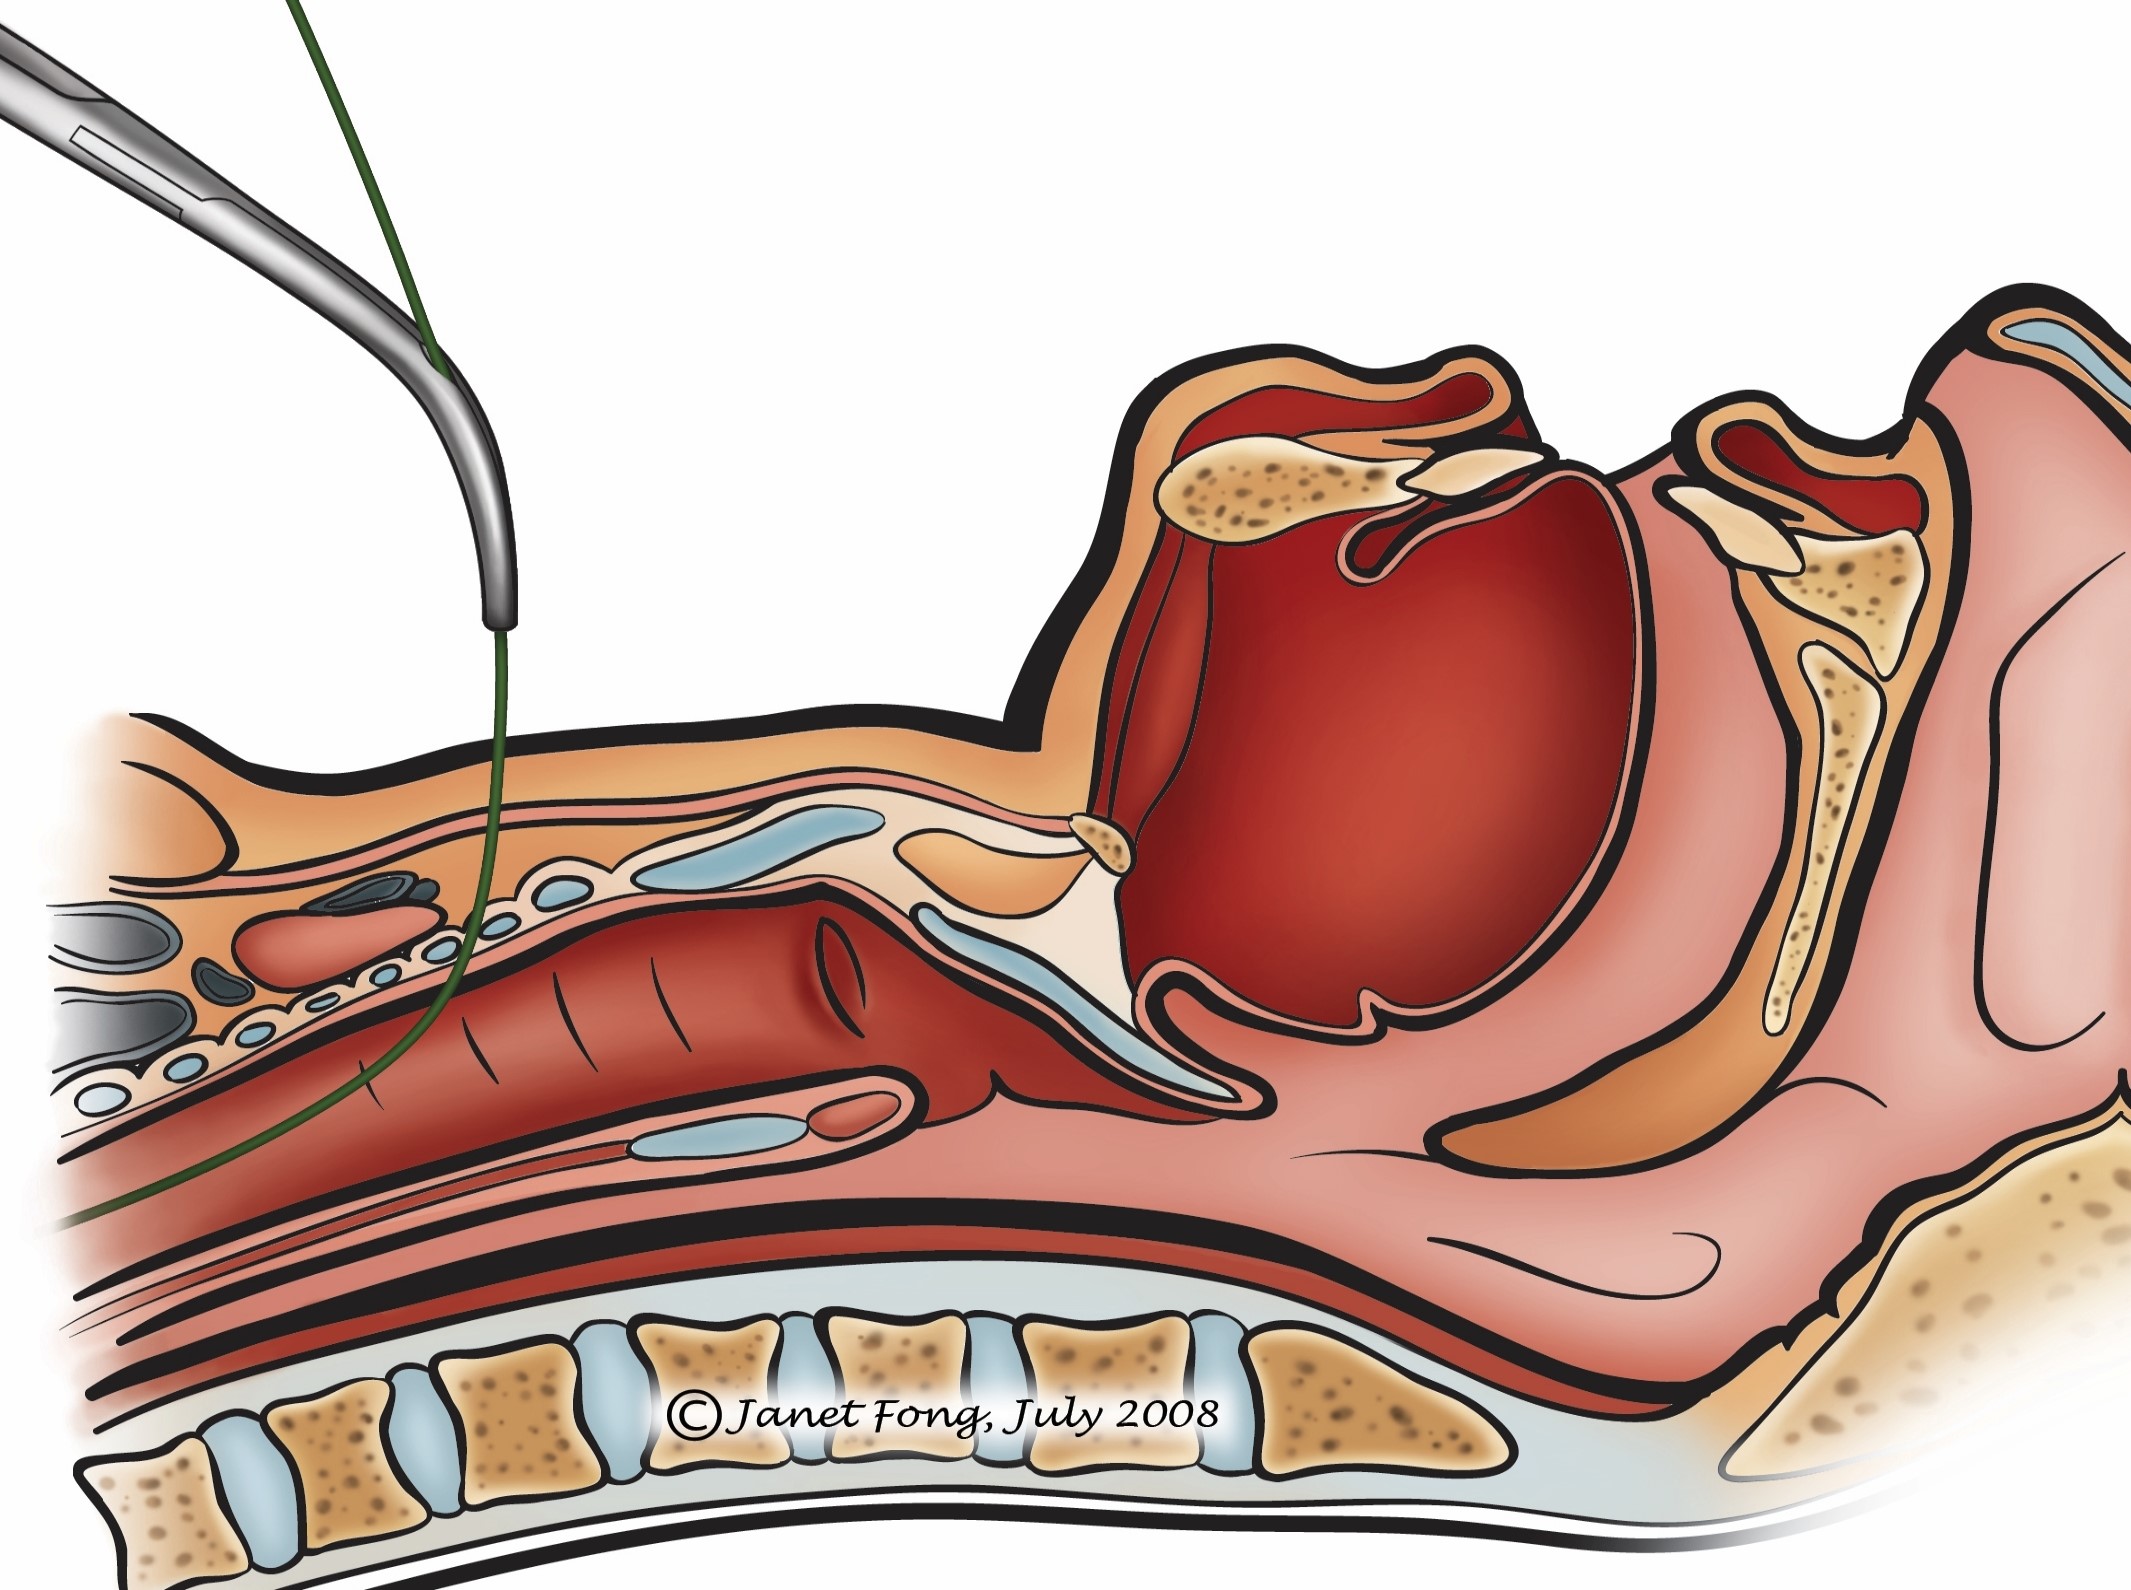
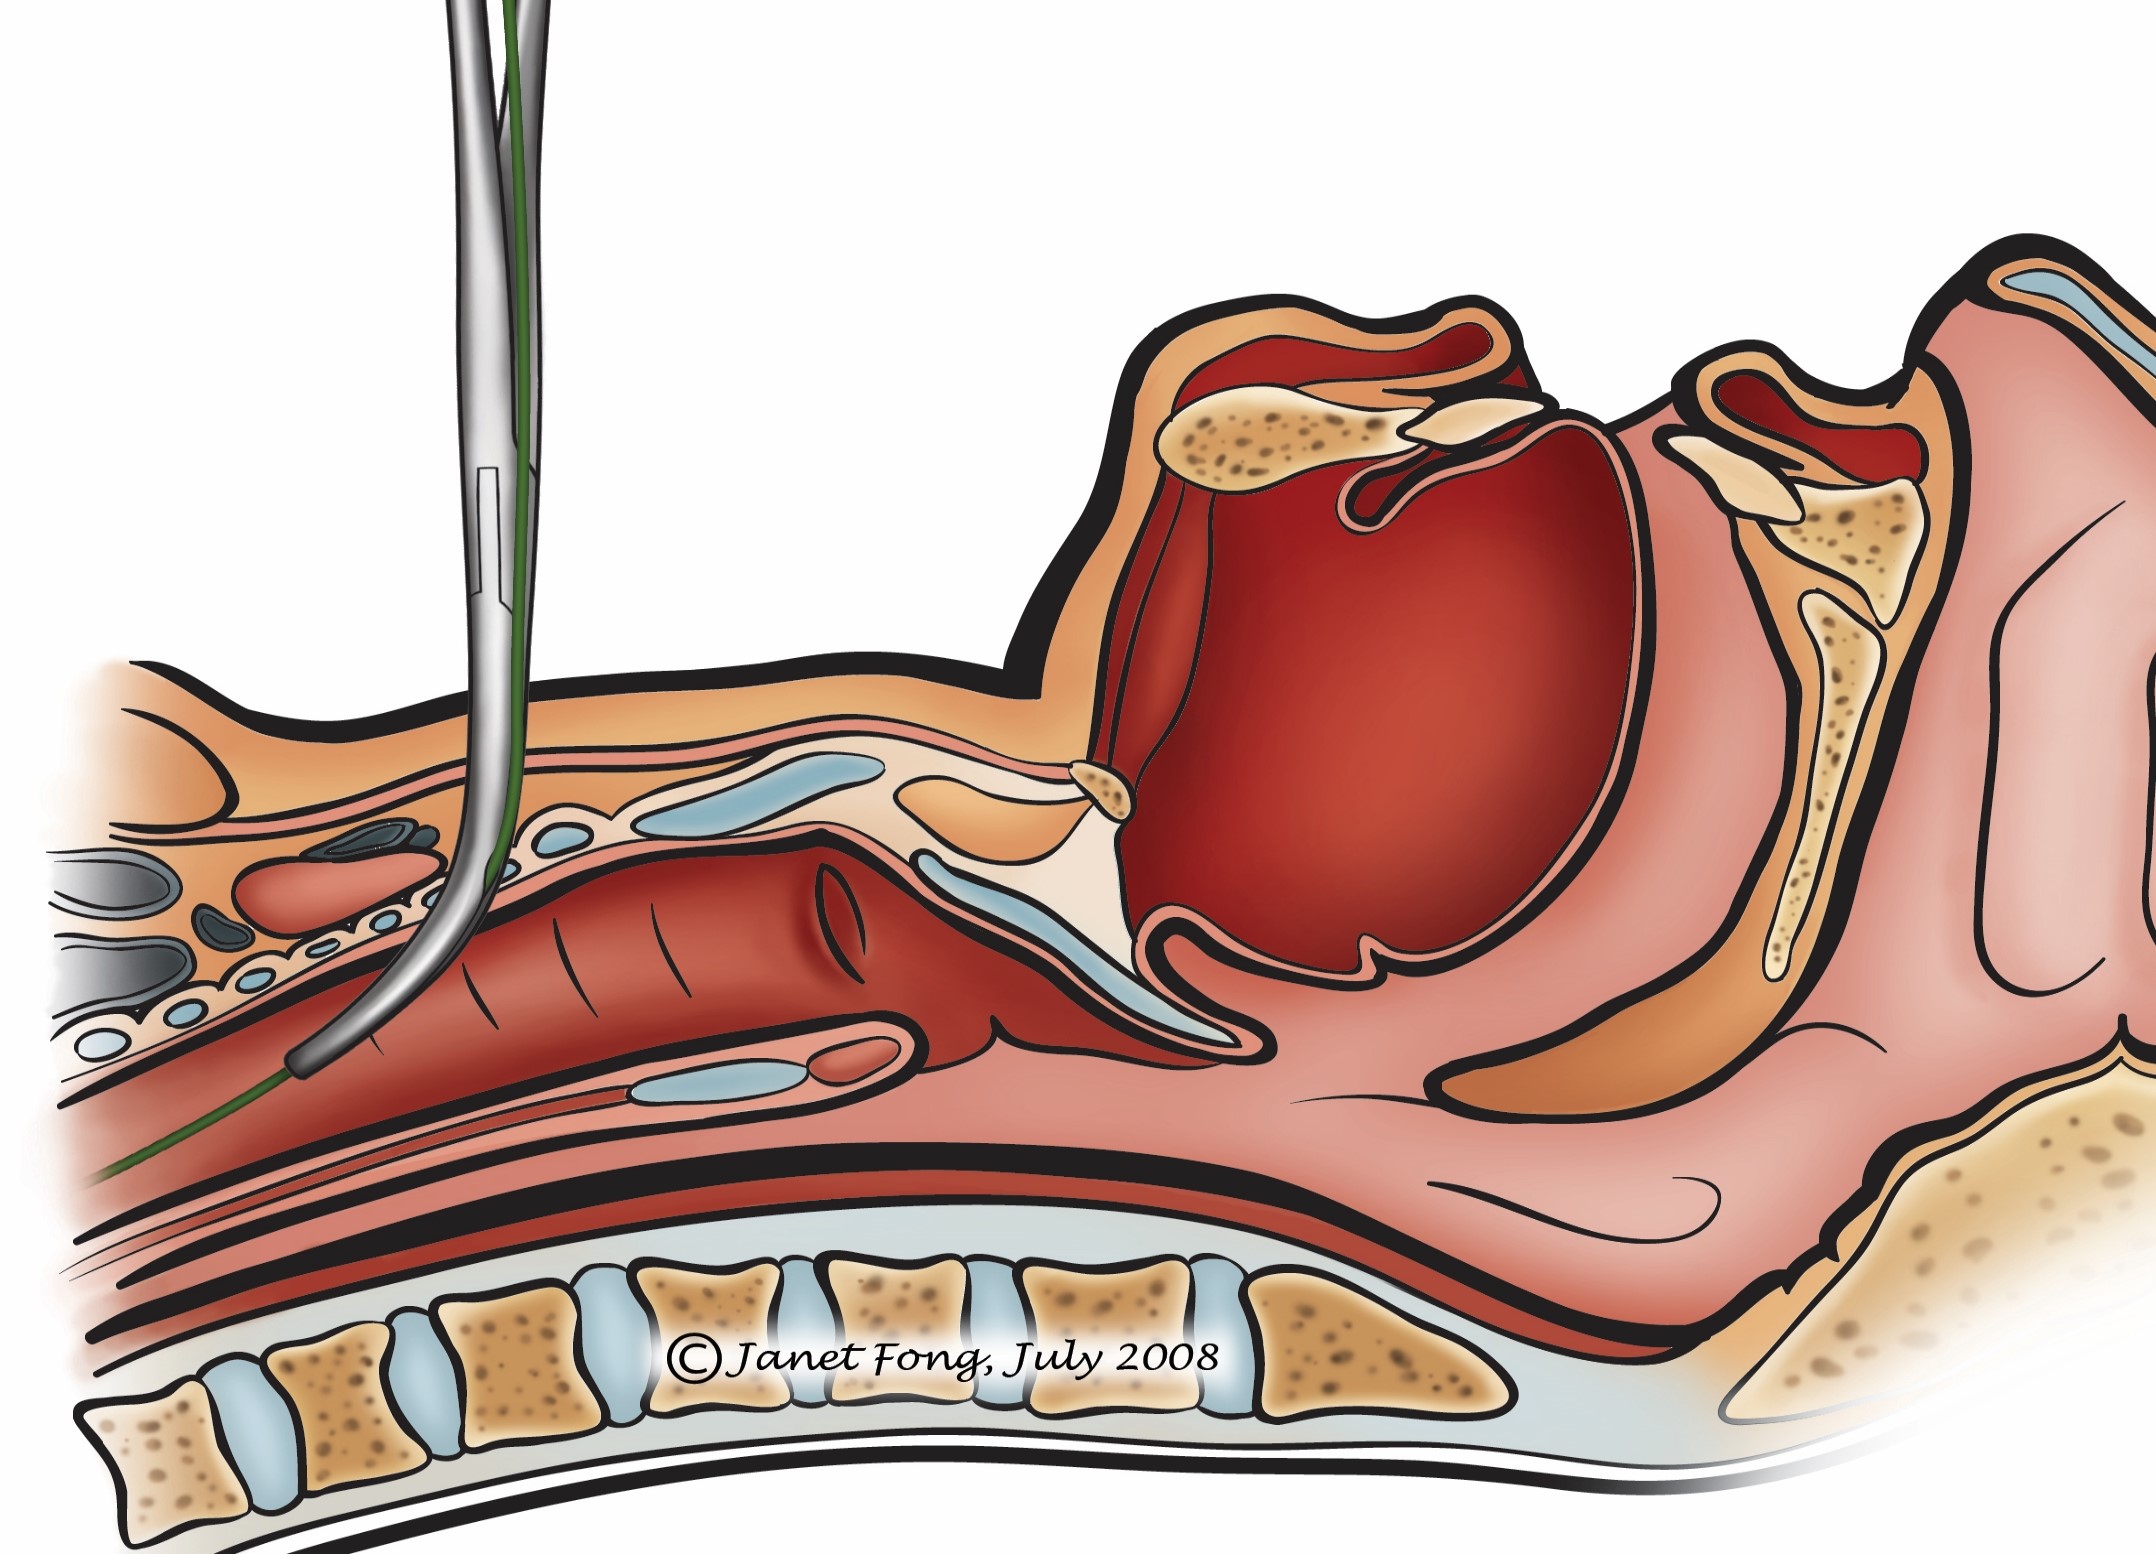
Percutaneous tracheostomy is similar to using a Seldinger technique to cannulate veins and arteries. The trachea is entered percutaneously with a thin needle through which a guide wire is advanced into the trachea. A bougie is passed over the guide wire and the tract between the skin and trachea is dilated until a tracheostomy tube can be advanced into the trachea (Figure 1). Unlike with conventional surgical tracheostomy, the trachea, thyroid gland and vascular structures cannot be visualised during placement of the tracheostomy or to achieve haemostasis should bleeding occur.
During the 1st weeks the tract between skin and trachea is unstable. The tract collapses with removing the tube during this time and makes reinserting a tube difficult and hazardous. Only after several weeks the tracheostomy tract is stabilised by granulation tissue making changing a tube possible.
Percutaneous dilational tracheostomy is in-dicated for selected ventilator-dependent patients in ICU, e.g. for prolonged transoral or transnasal endotracheal intubation.
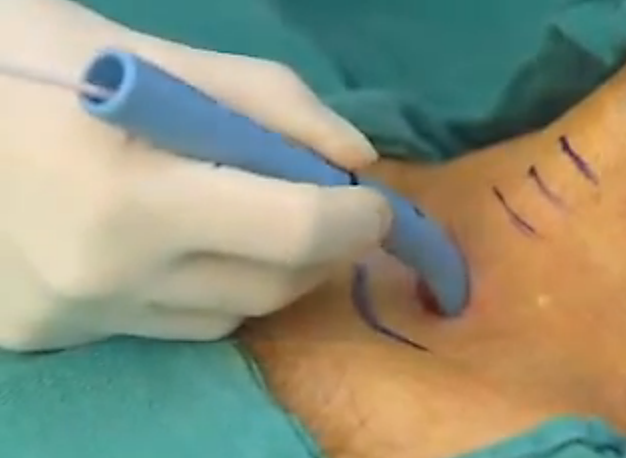
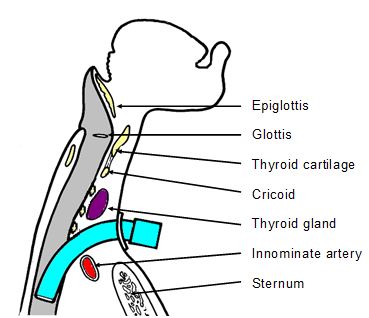
Inability to palpate thyroid and cricoid cartilages: The tracheostomy should enter the trachea between the 1st and 3rd tracheal rings, and should avoid the cricoid and thyroid cartilages. It is therefore crucial that one is able to clearly palpate and identify the thyroid and cricoid cartilages. With a fat neck or a goiter one cannot always palpate the laryngeal and tracheal structures, and one ends up with a very long tracheostomy tract which may create complications.
Anatomical factors: Laryngeal and tracheal anatomy may vary widely depending on the patient and his/her age. A larynx situated in the thoracic inlet (laryngoptosis) makes all kinds of tracheostomy difficult and one gets critically close to big mediastinal vessels. In such cases open dissection under direct surgical vision is required.
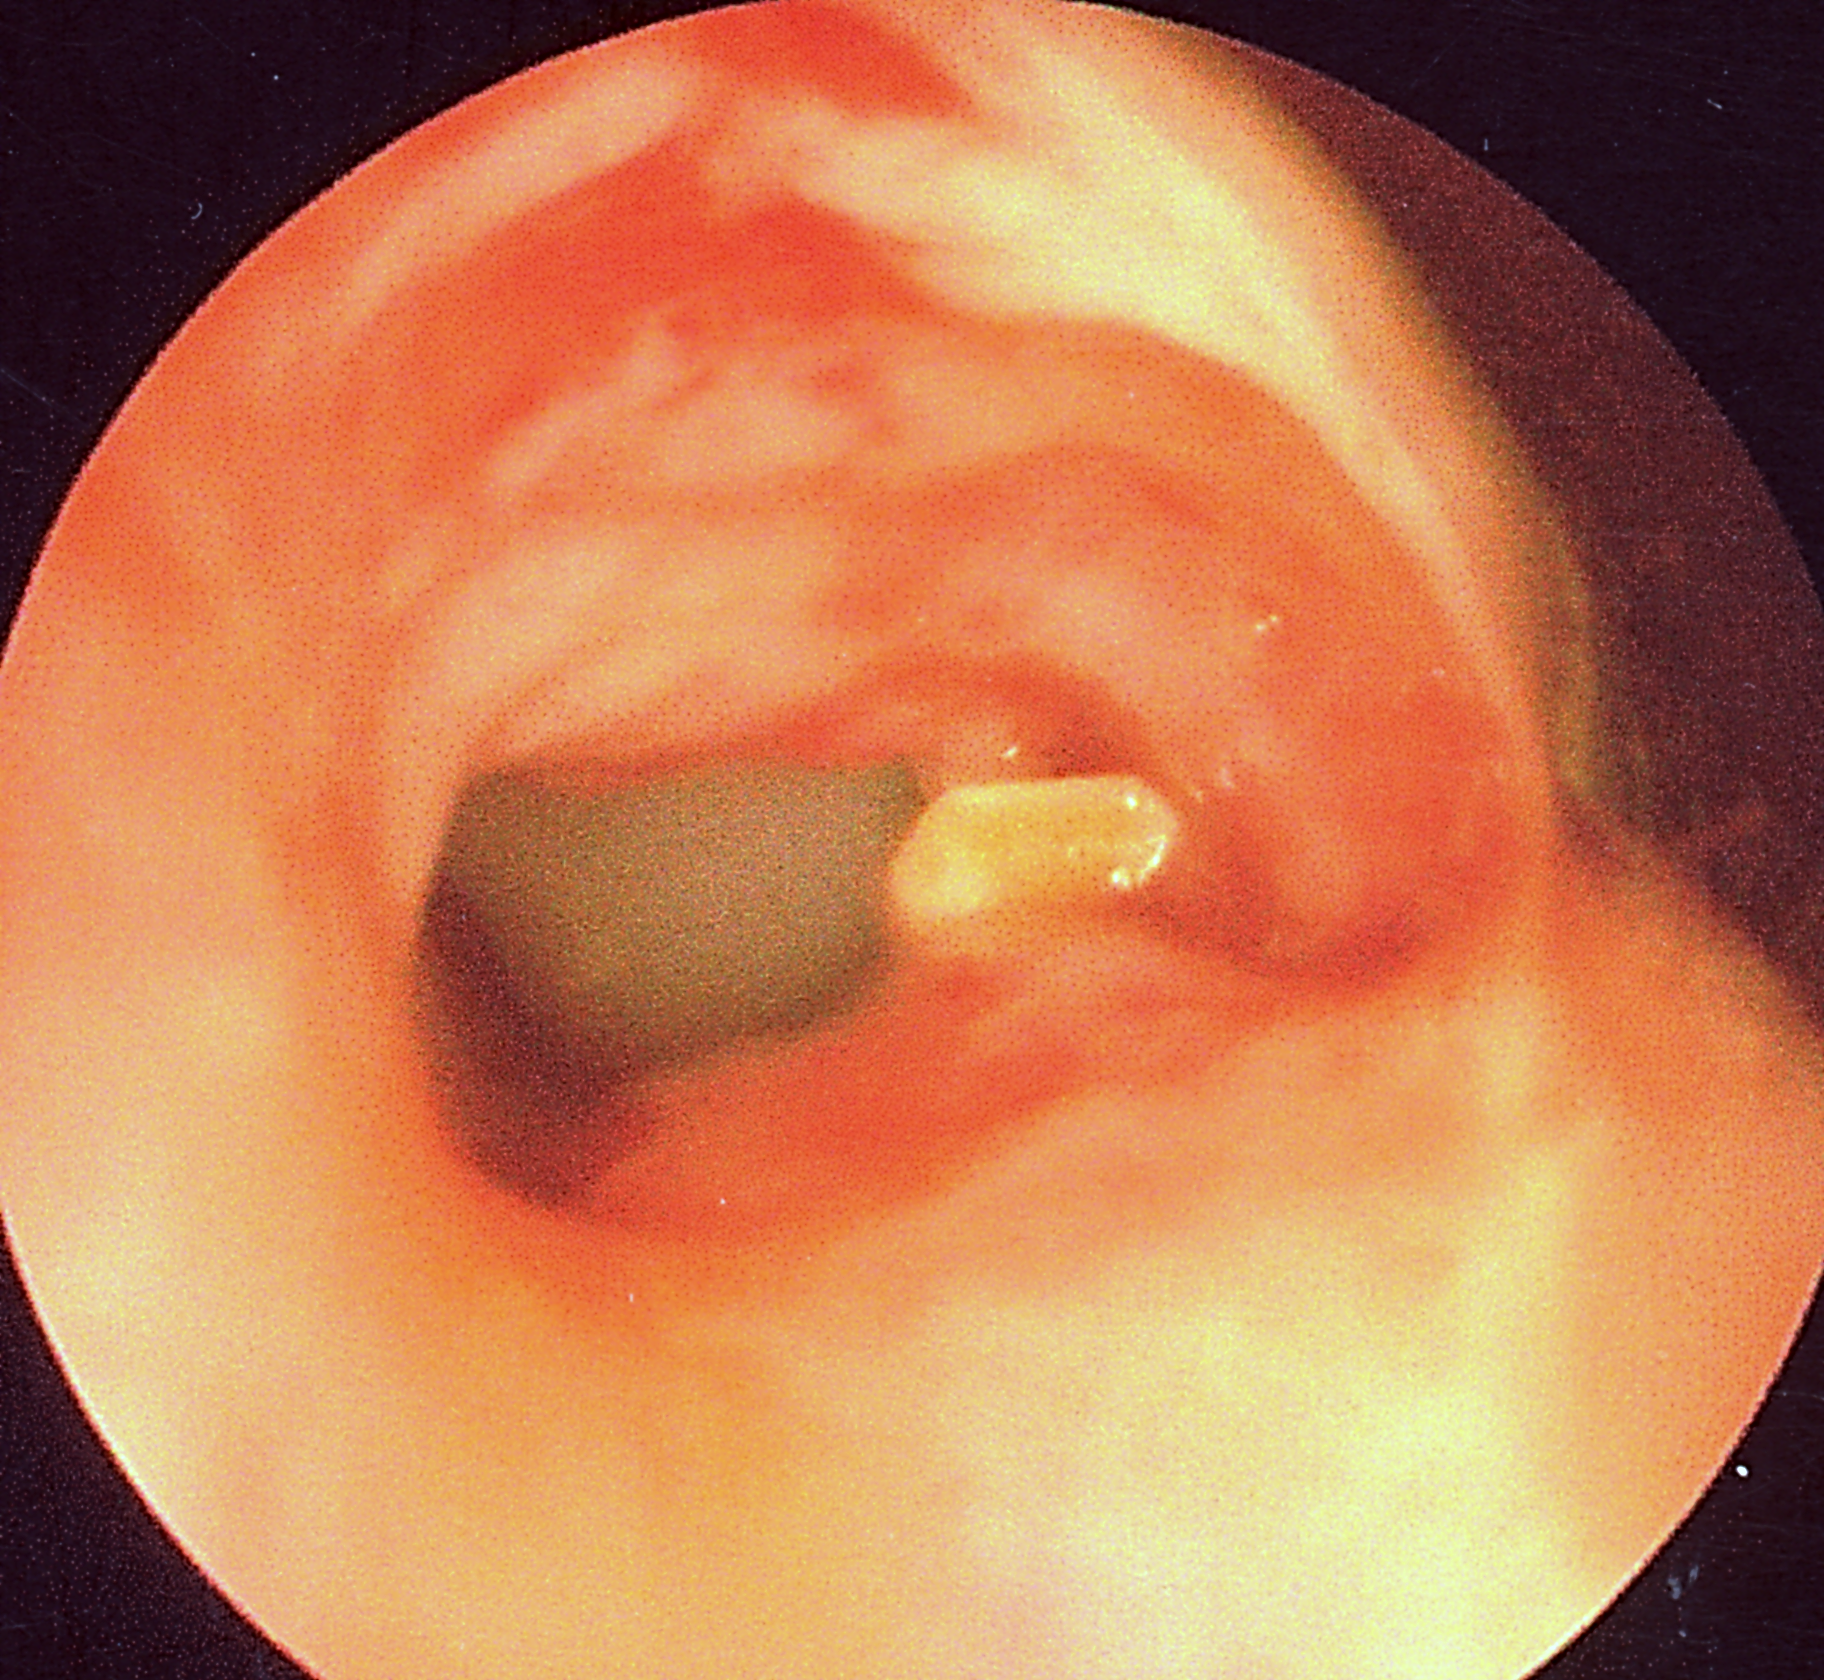
Thyromegaly or suprasternal mass: Any mass between the skin and trachea such as an enlarged thyroid or a tumour is a contra-indication to percutaneous tracheostomy. The thyroid gland and most tumours are vascular. Should bleeding occur following puncture and dilatation, one can compress the site. Subcutaneous bleeding may not be apparent with a tight skin collar. Bleeding can however enter the opened trachea as the hole in the trachea may be irregular especially in elderly patients with partial ossification of the tracheal rings that may even fracture (Figure 2).
Coagulation disorders: Percutaneous tracheostomy is contraindicated. The only means of haemostasis for bleeding from the tract is by compression with the dilating device or by exploring the neck.
Children: The authors do not advocate percutaneous tracheostomy in children <15yrs of age as it is difficult to palpate the trachea because of its small diameter and because the cartilage rings are soft and compressible. Some force is also required to perforate the skin and trachea which diminishes the tracheal AP-diameter and increases the likelihood to perforate the paries membranaceus (very thin, vulnerable posterior tracheal wall).
Patients requiring a tracheostomy after leaving ICU: A percutaneous tracheostomy tract will collapse for several weeks when the tube is removed to be changed. In ICU there is expert care to maintain a tracheostomy e.g. humidification and frequent suctioning to prevent crusting and obstruction. The tracheostomy may have to be changed immediately if obstruction occurs. This may not be possible in fresh percutaneous tracheostomies for the reasons given; hence emergency transoral intubation may be required and must be at hand. Therefore if a patient is planned to have a tracheostomy for longer than his/her presence in ICU, an open, stable, surgical tracheostomy must be done which permits simple tube changes. This would include patients with poor lung function requiring prolonged weaning, or patients with dysphagia and aspiration that need prolonged rehabilitation and a protective tracheostomy.
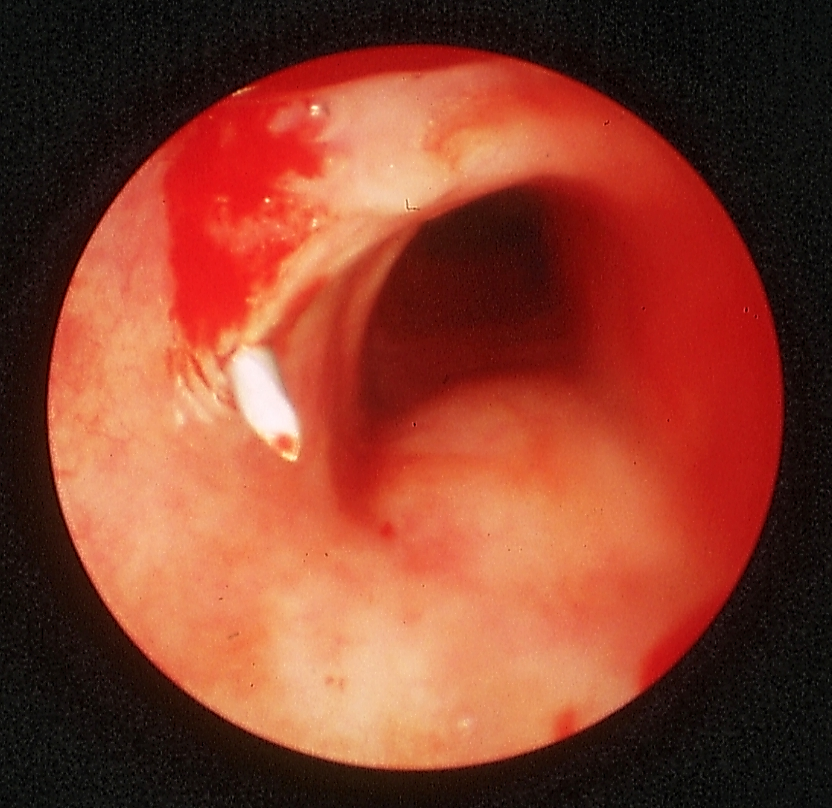
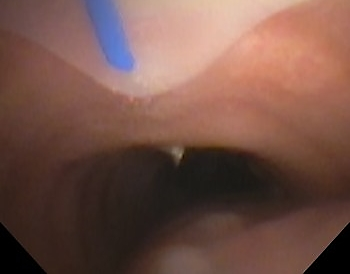
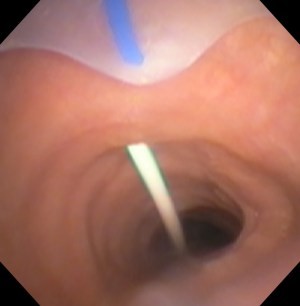
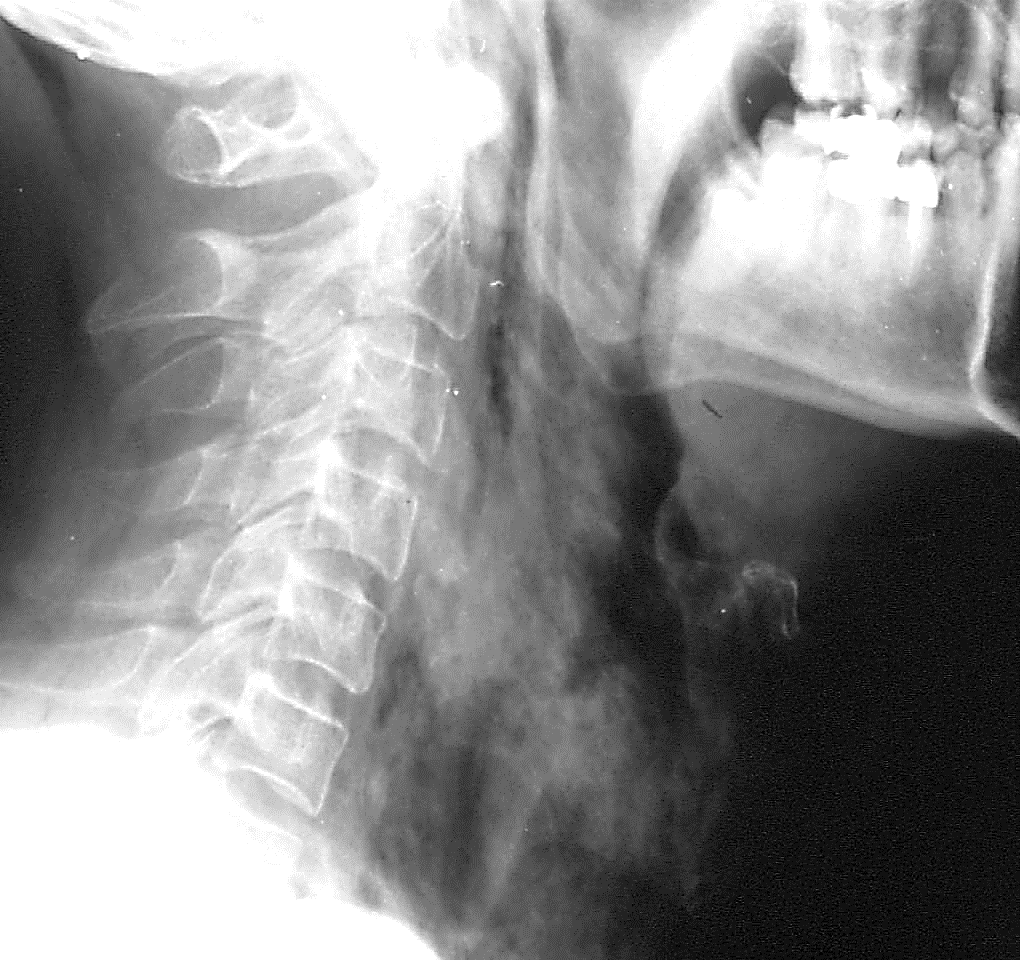
Unavailability of flexible or rigid bronchoscope and/or ultrasound: Finding and entering the trachea with a pilot needle may be difficult. One can of course aspirate air and guess that you are within the trachea. This does not however ensure that the trachea has been entered in the midline as air will be aspirated even with a laterally placed puncture which is not at all suitable for a dilatation manoeuvre (Figure 3).
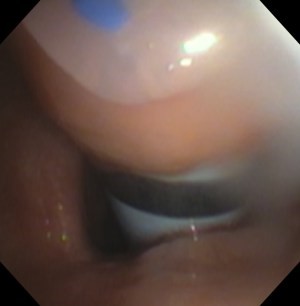
Therefore the tracheal puncture must be controlled by endoscopic vision. This is best achieved with a flexible endoscope that is guided through the endotracheal tube while in situ. The endotracheal tube is withdrawn to clearly reveal the anatomy of the lower larynx and trachea. Alternatively, tracheoscopy can be performed with a rigid scope, in which case the endotracheal tube is pulled back and ventilation is secured through the rigid scope. Sonography may also be employed to ensure correct placement of the tracheal puncture.
Difficult airway: The patient must be easy to intubate in the event that alternative techniques of ventilation by oro- or nasotracheal intubation is required should the patient’s airway obstruct following removal of the endotracheal tube e.g. with incorrect placement of the percutaneous tracheostomy, accidental decannulation, bleeding etc.
Emergency procedures: Dilational trach-eostomy should not be used in airway emergencies. Flexible or rigid tracheosco-py should be available (which is typically not the case in emergencies). Emergency access to the trachea should in such cases be achieved by cricothyroidotomy.
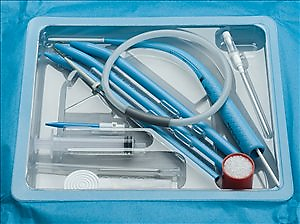
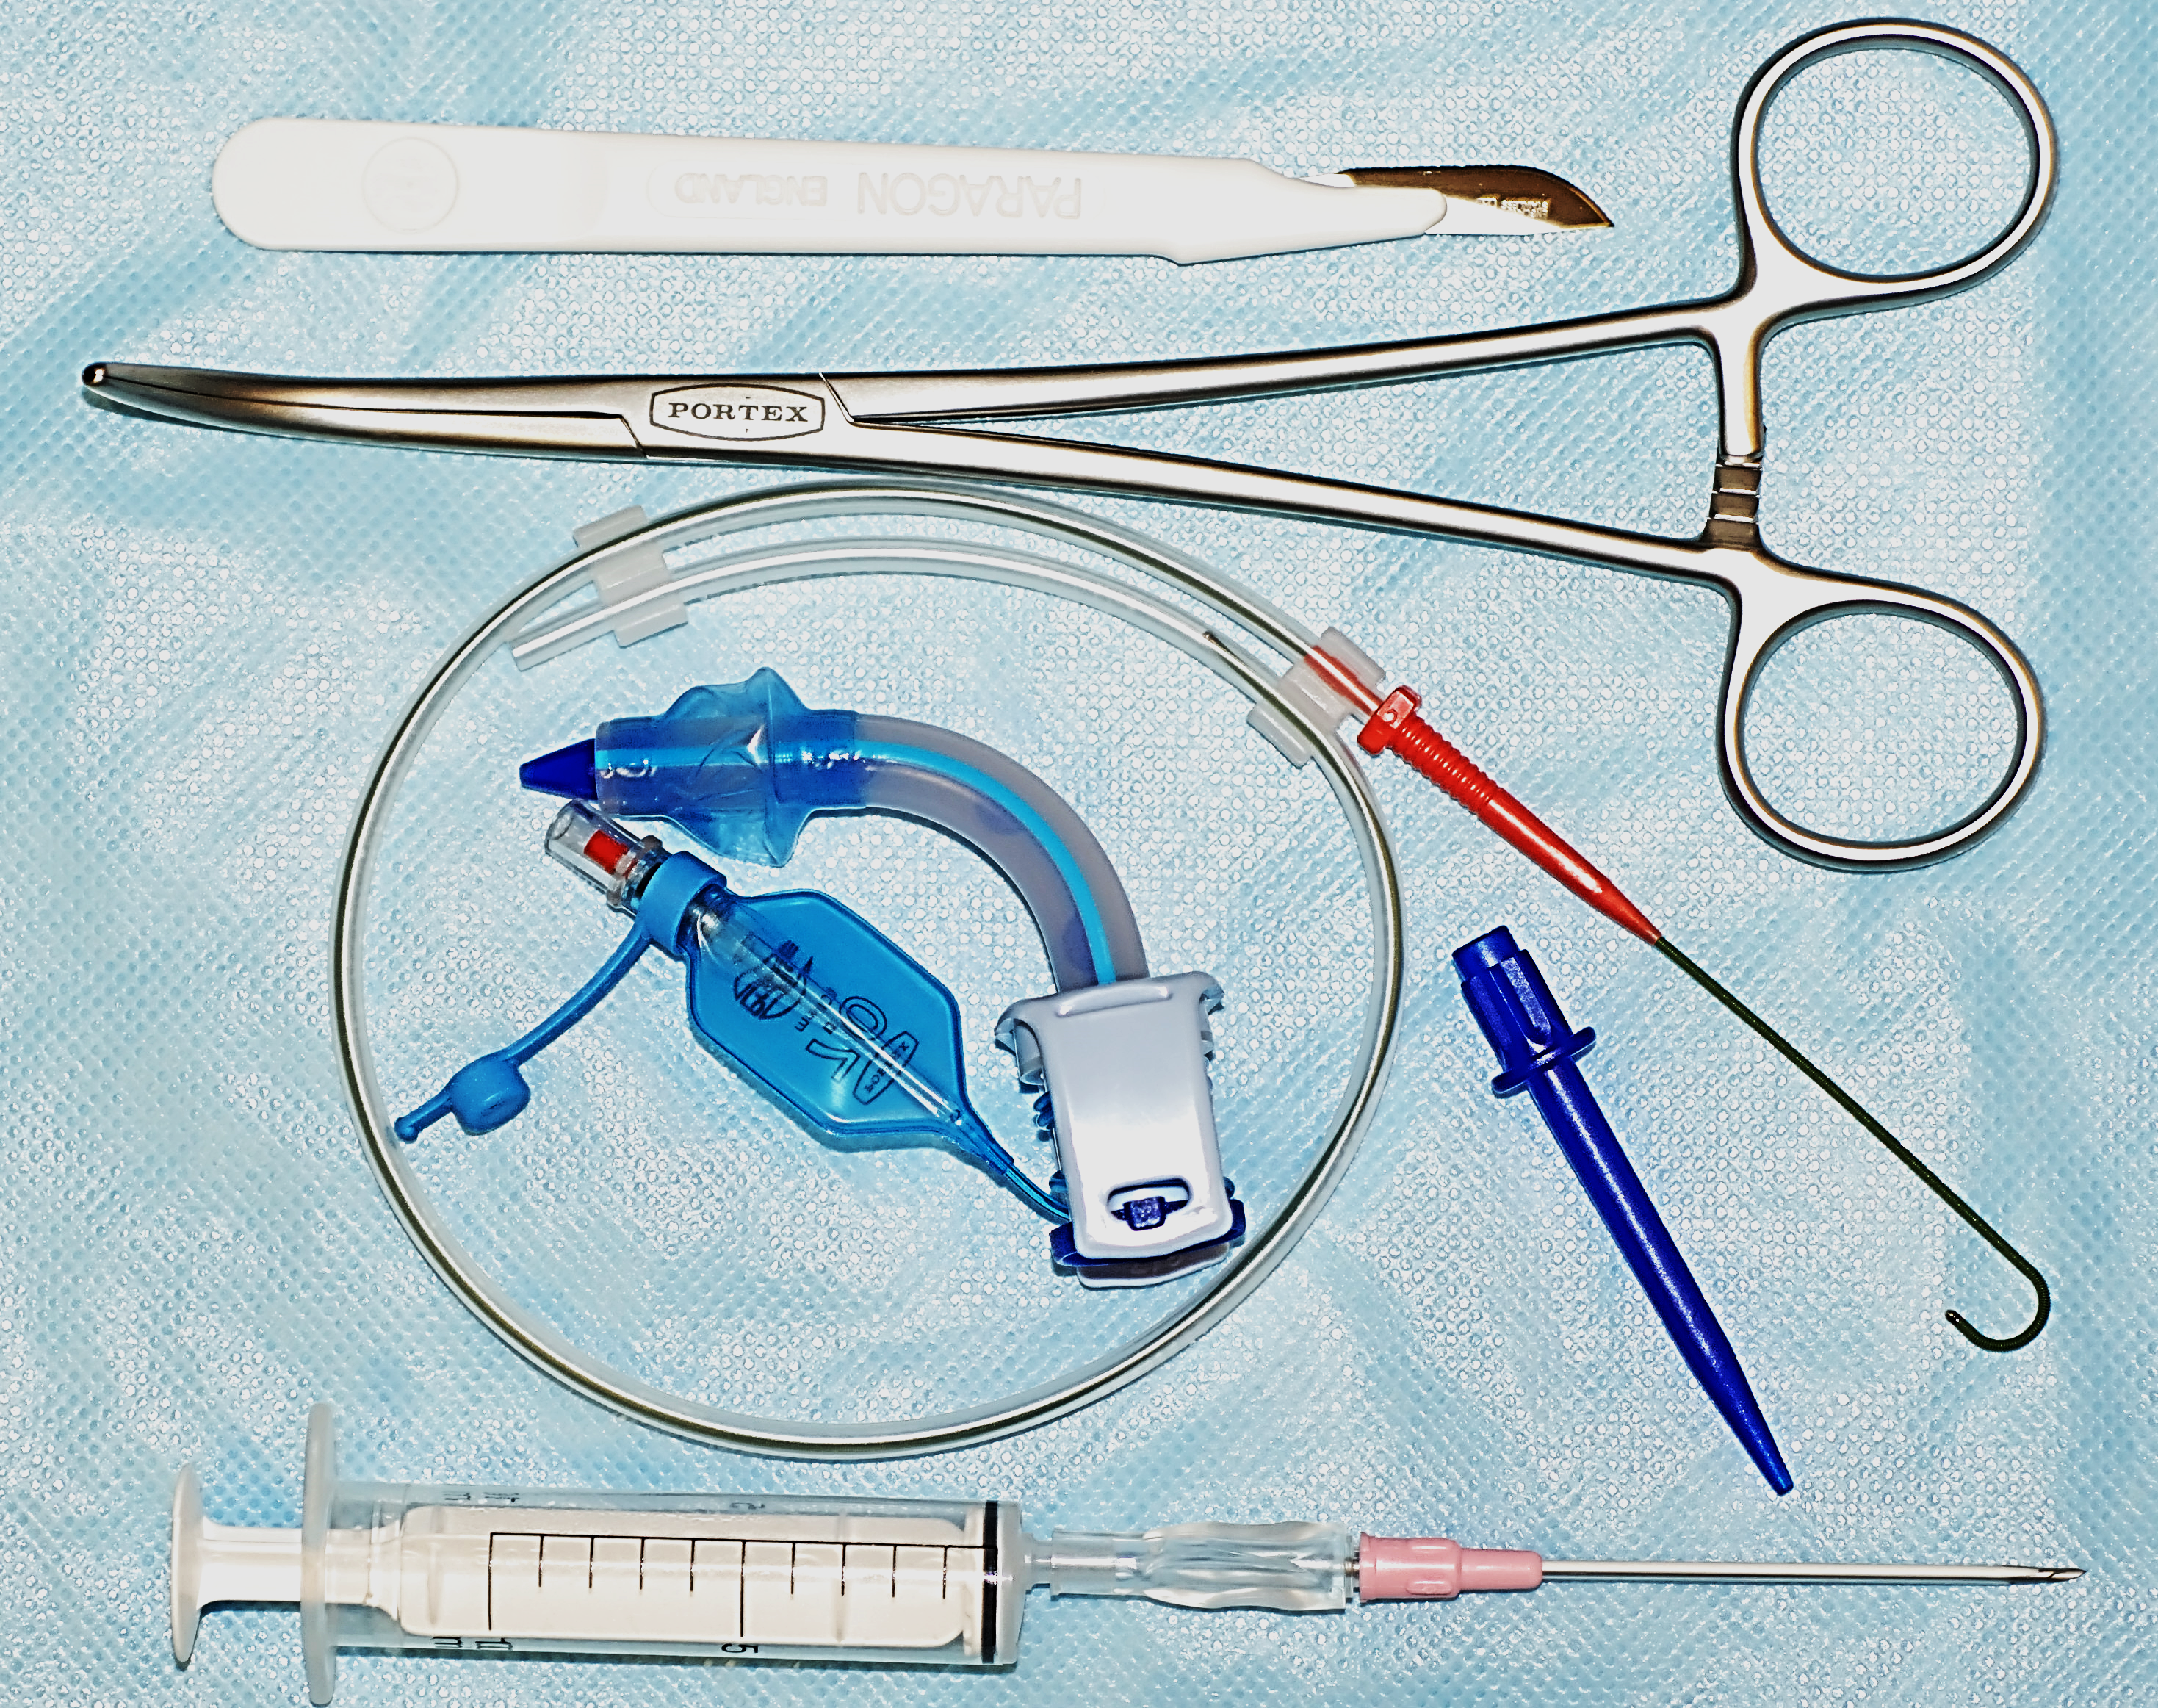
Several percutaneous dilational tracheos-tomy devices are commercially available. Each uses different tools and different surgical steps. It is advisable to stick to one system for reasons of quality assurance.
The trachea is first punctured with a small pilot cannula; next the tract is dilated into the trachea; finally the tracheostomy tube is inserted from externally into the trachea. It is strongly recommended that the tracheal puncture is done under endoscopic control. There is a technique that places the cannula from inside-to-outside as a translaryngeal pull-through technique.
Commercially available kits vary principally in terms of the dilation instrumentation. Every device is delivered with detailed guidelines which should be referred to before use!
The Ciaglia Blue Rhino & Dolphin systems use serial dilators to dilate the tract over a guide wire, and the tracheostomy tube is advanced over the final dilator (Figures 1, 11).
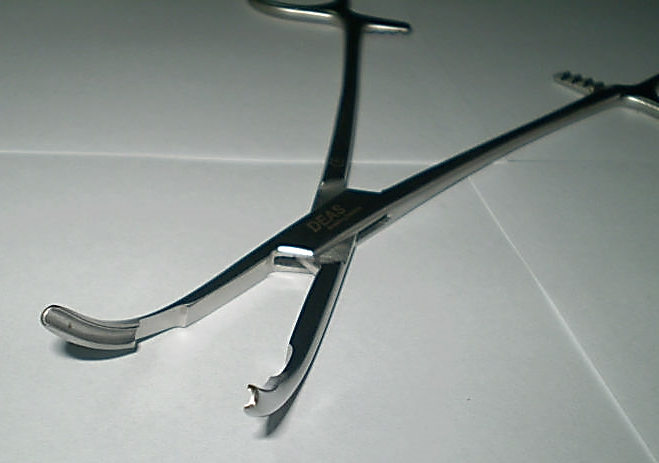
With the Griggs and Rapitrach systems the tract is dilated with forceps, which is grooved so that it can be advanced over a guide wire (Figures 12, 13).
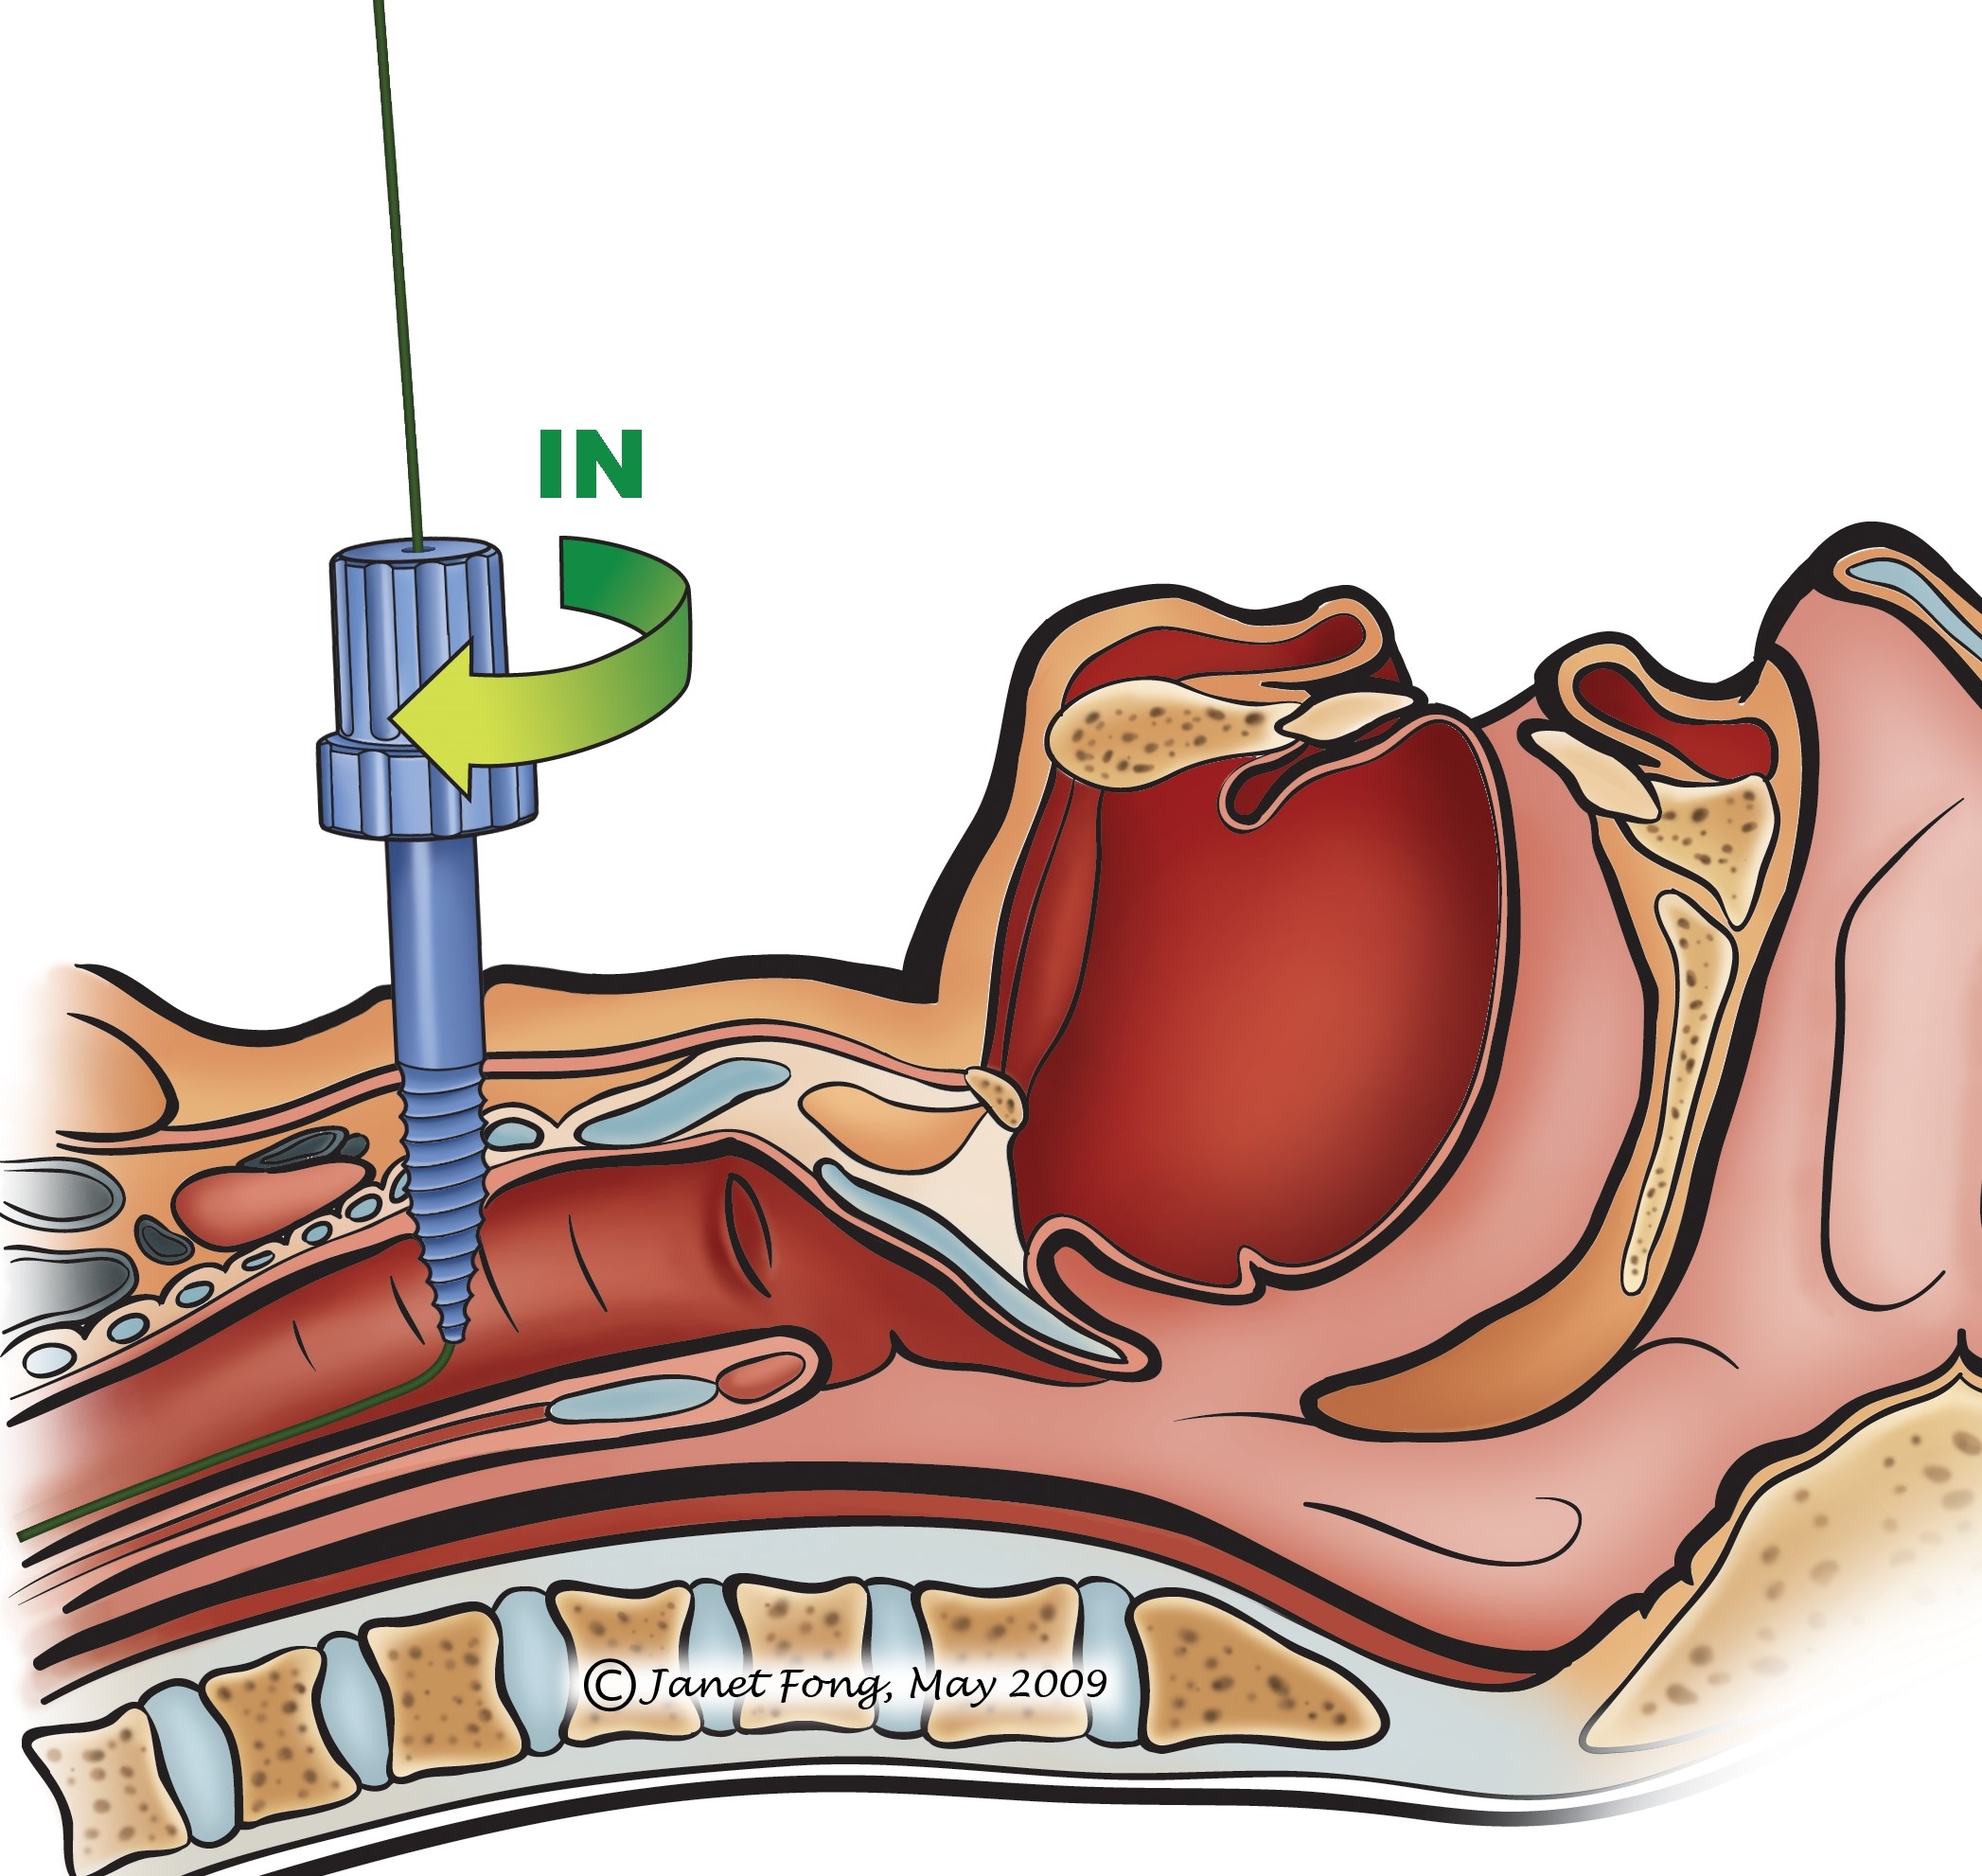
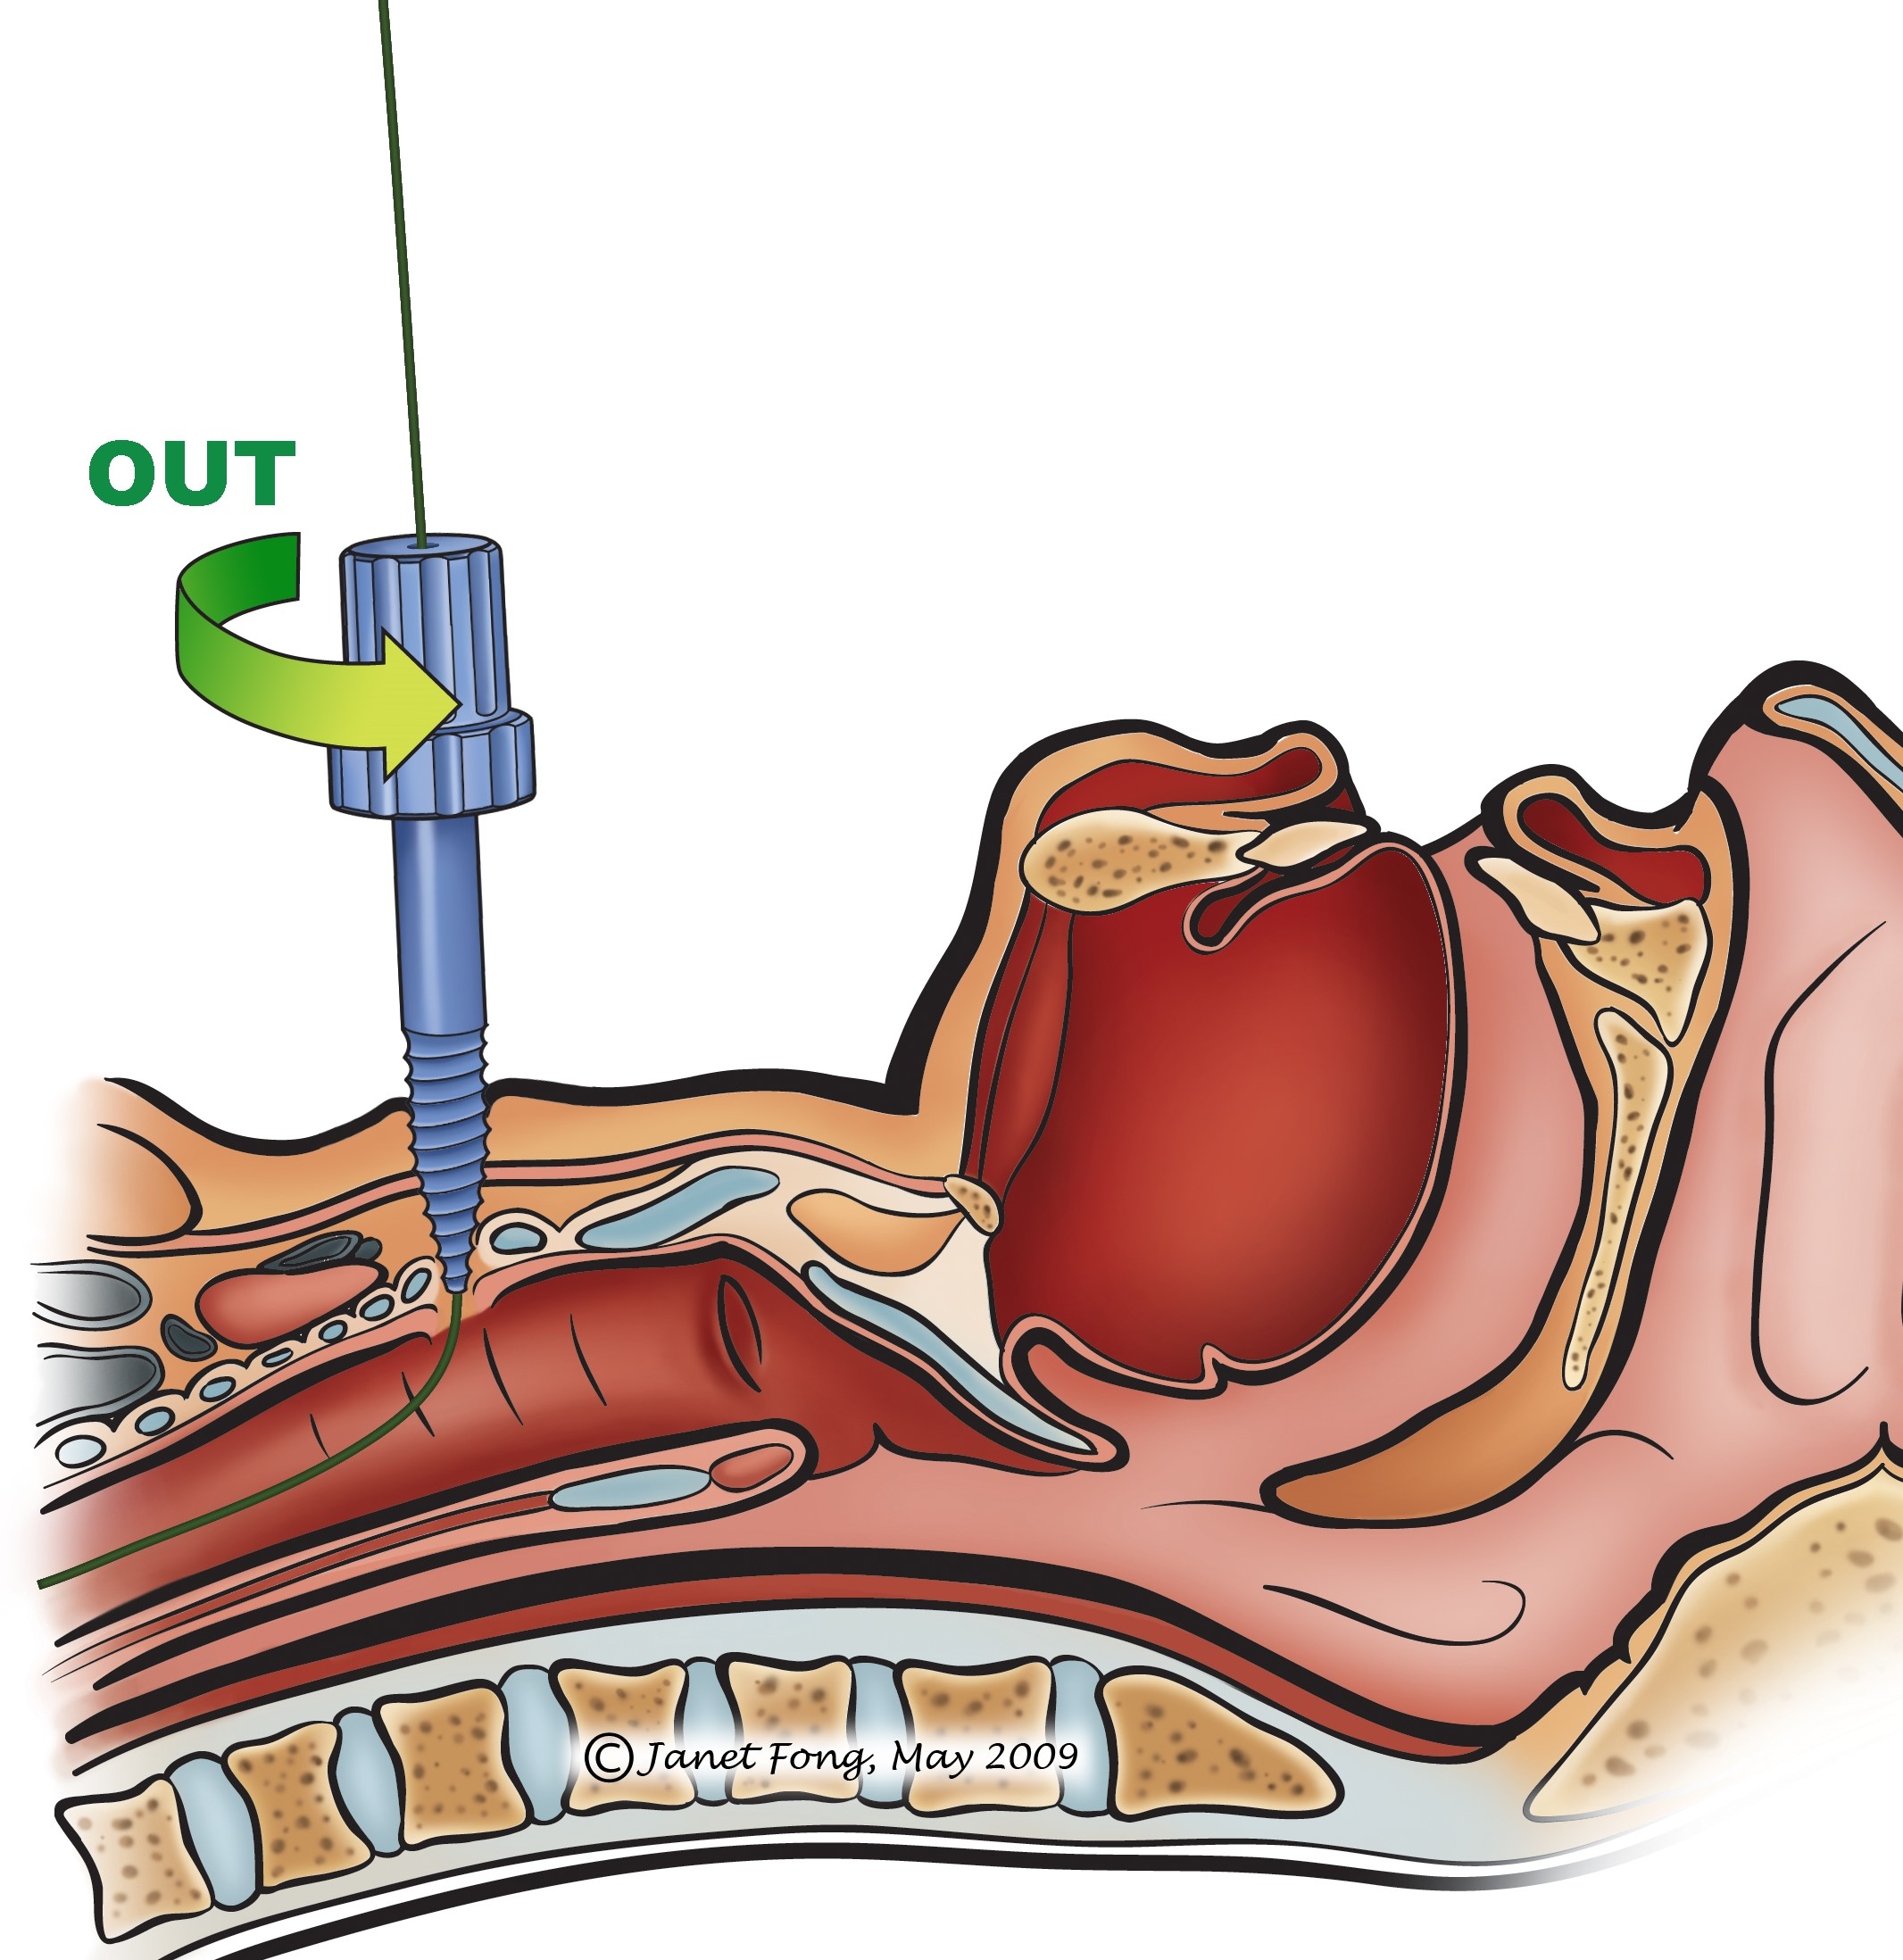
The Percutwist system dilates the tract with a conically shaped, semi-sharp screw over a guide wire (Figures 14a, b). The screw exerts a radial force to open the trachea. Using the screw avoids impressing the anterior tracheal wall and flattening the tracheal lumen in its AP-diameter and hence injuring the posterior tracheal wall.
Unlike the systems described above, the Fantoni system employs a translaryngeal tracheostomy technique. The tracheostomy tube is inserted by passing it transorally and then inside-out out from the trachea to the cervical skin. The endotracheal tube must first be replaced with a smaller tube. The trachea is then punctured percutaneously with a small needle under endoscopic vision. A metal guide wire is passed through the needle into the trachea and out through the mouth. The end of the guide wire is attached to a special tracheostomy tube with a dilating metal tip where it connects to the guide wire.
This device is then drawn through the oral cavity and the larynx into the trachea adjacent to the endotracheal tube, and out through to the neck, by pulling on the guide wire. As the tracheostomy tube ends up with its tip facing upwards towards the larynx, it must be rotated 180° for its tip to be directed towards the carina. This turning procedure is done with a special device and must be carried out very carefully not to injure the larynx or trachea.
Some complications have already been mentioned under “Indications” and “Con-traindications”.
Collapse of tracheostomy tract: The trach-eostomy tract collapses every time a tracheostomy tube must be changed, especially in the initial weeks following percutaneous tracheostomy before the tract has matured. This may be particularly dangerous when accidental decannulation occurs in a tracheostomy-dependent patient outside an ICU setting. The solution is to create a formal surgical tracheostomy with a safe, stable tracheostomy tract in patients requiring a long-term tracheostomy.
Bleeding into neck or airway: This can be life-threatening when clots aggregate in the trachea and bronchi, even with the cuff inflated. When clots cannot be removed by suction, they have to be removed like for-eign bodies by rigid endoscopy. Therefore if bleeding is encountered during the per-cutaneous procedure, it has to be converted to a formal surgical tracheostomy so that haemostasis can be achieved. Secondary bleeding also demands surgical revision.
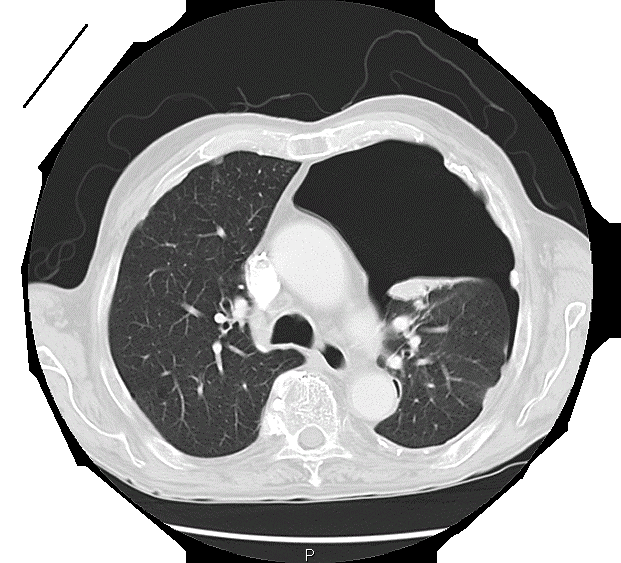
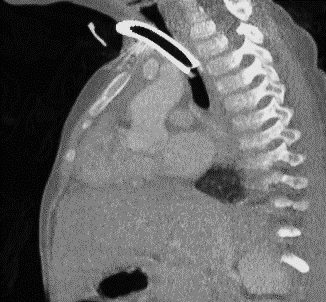
Surgical emphysema or pneumothorax (Figures 15, 16): Minor surgical emphysema of the neck can occur following surgical or percutaneous tracheostomy, is often self-limited and sometimes is not even clinically apparent, but apparent only on X-ray or CT-scan. As microbial contamination with air is possible, antibiotics are administered. If emphysema persists or extends into the mediastinum, or if there is a pneumothorax, the situation must be evaluated endoscopically to rule out tracheal perforation or other pathology requiring intervention. A pneumothorax may require an intercostal drain.
Accidental decannulation or displacement of tracheostomy tube: When a tracheostomy tube inadvertently slips out of the trachea it may not be possible to reinsert it if it occurs in the initial days after percutaneous tracheostomy because of an immature tracheostomy tract. One can try to probe and redilate the tract using percutaneous tracheostomy instruments or a nasal speculum (Figure 16), and reinsert the tracheostomy tube. In a ventilated patient one needs to immediately intubate the patient with an oro- or nasotracheal tube to continue ventilation. If one is unable to reinsert the tracheostomy, then a formal surgical tracheostomy should be performed.

Laceration of posterior tracheal wall: Figure 17 illustrates how easy it is to lacerate the posterior tracheal wall. A laceration may be superficial, or can be deep into the mediastinum with fat visible on endos-copy. A laceration may be aggravated by pressure exerted by the cuff. It must be suspected when more and more air in the cuff is required to achieve a seal. The solution is that the cuff of the tracheostomy tube must not be situated over the defect in the posterior tracheal wall. This may require that the tube be advanced so that the cuff is positioned further down the trachea. The cuff position needs to be checked endoscopically and one should ensure that both lungs are ventilated. Alternatively one should reassess whether the patient can be decannulated in order that the lesion can heal without intervention other than broad

spectrum antibiotics to prevent mediastini-tis. If the above solutions are not feasible, a special endotracheal tube is inserted that straddles the tracheal bifurcation without exerting pressure on the lesion and allows ventilation of both lungs. Such tubes can be passed transorally but may be difficult to pass without further injuring a lacerated trachea. Alternatively one can perform a wide surgical tracheostomy and pass such a tube via the neck. In selected cases when such a special tube could not be placed without a leak, the author inserted 2 small endotracheal tubes via a tracheostomy, one for each lung. Positioning the tubes is difficult and must be controlled endoscopically. Special care must be taken for the tube not to obstruct the upper lobe of the right lung. As most such patients are critically ill, the prognosis of a major laceration of the posterior tracheal wall in a ventilated patient is generally poor.
False tract (Via falsa) (Figure 18): This occurs when a tracheostomy tube is inserted into a false tract ventral or lateral to the trachea. It may manifest as an inability to ventilate the patient or to pass a suction catheter through the tracheostomy into the lungs, high ventilation pressures, massive

surgical emphysema, hypoxia and death. Endoscopy through the tube will verify that the tip of the tube is not in the tracheal lumen. The problem may be compounded by bleeding from lacerations of structures in the upper mediastinum e.g. veins, arteries or thyroid. The solution is that one should always check the position of the tracheostomy tube by one or more of the following means: use an endoscope during the percutaneous tracheostomy procedure to confirm correct placement of the puncture and tube; pass a suction tube into the lungs; ventilate the patient by hand and listen for breath sounds in both lungs; and order a chest X-ray to check the position if the tracheostomy tube and to exclude surgical emphysema, a pneumomediastinum and a pneumothorax. If the position of the tube remains in doubt, perform an open surgical approach, identify the trachea, and create a stable tracheostomy. If a false tract is found, attention must be directed especially to the space between the skin and the anterior tracheal wall as this access to the upper ventral mediastinum must be covered to protect the innominate artery or aberrant carotid to avert fatal bleeding (Figure 19).
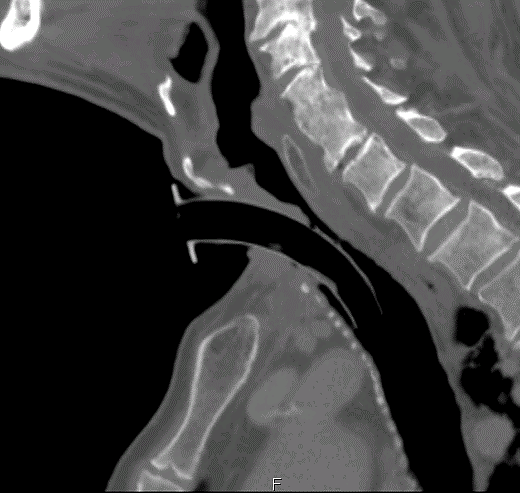
High tracheostomy (Sectio alta): When a percutaneous tracheostomy is performed too high, it may violate the cricoid (Figure 20) or pass through the cricothyroid mem-brane (Figure 21), or in rare cases even enter the airway through the thyroid cartilage. This problem may be encountered in patients with massive laryngoptosis in whom the larynx sits in the suprasternal notch. Correct identification of the thyroid cartilage, cricothyroid membrane and cricoid can be difficult for inexperienced doctors and in patients with thick, short necks, or following prior surgery, or if the neck cannot be extended. For an inexperienced endoscopist, identification of the cricoid is difficult as well. A too-high tracheostomy may initially function well as the airway is secured. Significant problems arise after decannulation, as the airway manifests massive and irregular scarring with stenosis and/or functional problems relating to the vocal cords. Microbial inflammation of the cartilage may make it even worse. The solution is that should sectio alta be suspected, a clear diagnosis should be made by endoscopy and CT-scan or at least a lateral cervical X-ray. The situation must be addressed

by creating a tracheostomy at the correct site. The “wrong” access must be closed and the airway reconstructed following the rules of reconstructive laryngeal surgery. In some cases internal stenting as is done after trauma may be necessary.
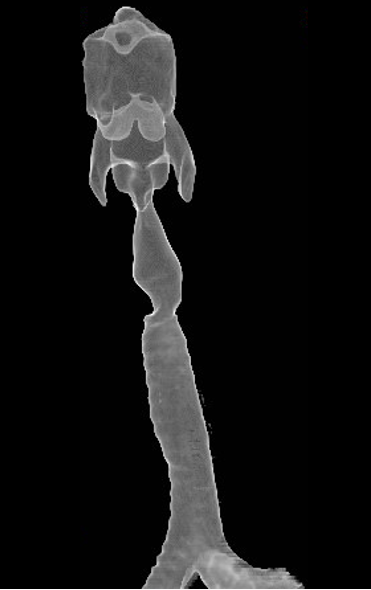
Tracheal stenosis (Figure 22): This is a late complication of percutaneous tracheostomy. Once ventilation is no longer required the patient is decannulated and the tracheostomy site heals without complications. When the tracheal walls are partly destroyed by the procedure or by inflammation and chondritis, an unstable trachea results at the tracheostomy site (tracheomalacia) manifesting as stridor. This may not be clinically apparent immediately after decannulation, but may only manifest days, weeks or months later.
Therefore if a patient develops inspiratory stridor and respiratory distress even weeks or months after closure of a tracheostomy (percutaneous or surgical), then an endoscopic evaluation with a flexible or rigid endoscope is required. Flexible endoscopy with spontaneous breathing is recommended, as one can better diagnose tracheomalacia in the extrathoracic trachea with spontaneous breathing. A major stenosis requires rigid endoscopy and bougienage or balloon dilatation of the stenotic segment. Further treatment of such a stenosis must follow the art of treatment of tracheal stenosis which may include retracheostomy, a Montgomery tube, tracheal resection and end-to-end anastomosis, and rib cartilage grafting etc.
Percutaneous tracheostomy is often promoted as being “fast, safe, and easy” to perform. It is being performed more-and-more successfully and safely, especially when doctors adhere to the correct indications and contraindications. However in clinical practice one is seeing tendencies to expand indications which may sometimes be to the detriment of a typically critically ill patient, who may then experience additional problems as a consequence of injudicious use of a percutaneous as opposed to a formal surgical tracheostomy.
As the use of percutaneous tracheostomy increases, fewer physicians and surgeons have the expertise to perform a good surgical tracheostomy. In the era of percutaneous tracheostomy, surgical tracheostomies are typically reserved for difficult cases such as very thick necks, bleeding disorders or significant laryngoptosis. This makes it hard to teach young surgeons how to perform a good surgical tracheostomy, as a surgical tracheostomy is not an easy procedure for beginners to perform alone at 4 pm! In difficult cases it can be hard to identify the trachea and make a tracheal opening that is wide enough to allow for safe cannulation, but narrow enough not to cause tracheomalacia and later stenosis, at the former tracheostomy site.
Each procedure remains as good as the indication used to perform it!
Figures 1, 13, 14: http://www.aic.cuhk.edu. hk/web8/Tracheostomy%20diagrams.htm (Janet Fong)
Figures 5, 6, 8: http://resusreview.com/ 2015/perc-trach-step-step-tutorial/ (Charles Bruen)
Prof. Dr. med. Thomas Deitmer
Director
ENT Department
Klinikum Dortmund
Germany
thomas.deitmer@klinikumdo.de
Johan Fagan MBChB, FCORL, MMed
Professor and Chairman
Division of Otolaryngology
University of Cape Town
Cape Town
South Africa
johannes.fagan@uct.ac.za