RIGID LARYNGOSCOPY, OESOPHAGOSCOPY & BRONCHOSCOPY IN ADULTS
Adult bronchoscopy, rigid oesophagoscopy and laryngoscopy for both diagnostic and therapeutic reasons are generally done under general anaesthesia. Panendoscopy (all 3 procedures) is commonly performed to rule out synchronous primaries with squamous cell cancer of the upper aerodigestive tract. This chapter covers the techniques, pitfalls and safety measures of these 3 procedures.
Morbidity of rigid endoscopy
Sharing the airway with an anaesthetist requires close communication and a good understanding between surgeon and anaesthetist.
It is surprising how often rigid endoscopy causes minor extralaryngeal and extra-oesophageal trauma. It is extremely easy to tear or perforate the delicate tissues that line the upper aerodigestive tract; this can lead to deep cervical sepsis, mediastinitis and death. Consequently it is important that a surgeon exercises extreme caution and knows when to abandon e.g. a difficult oesophagoscopy procedure.
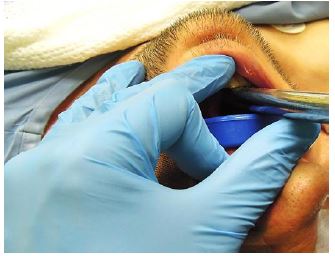
Mucosal injury occurs in up to 75% of cases and commonly involves the lips or angles of the mouth 1. To protect especially the lower lip one should advance the scope over the fingers of the non-dominant hand (Figure 1).
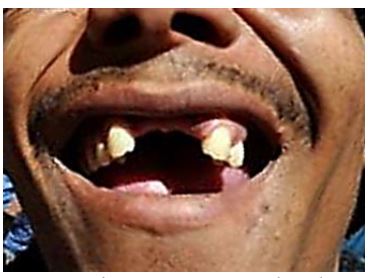
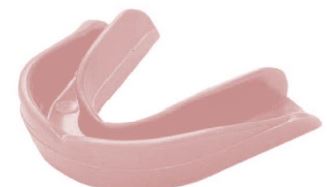
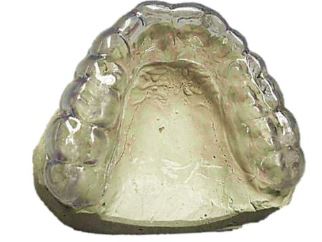
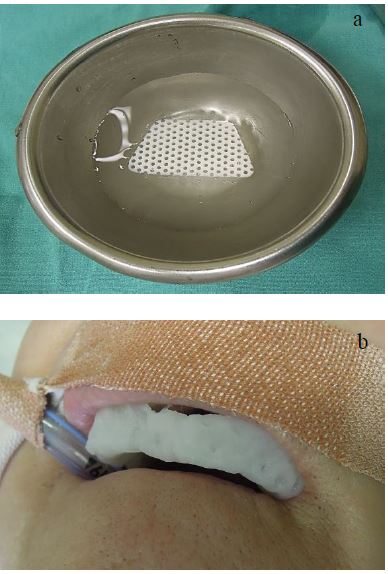
Dental trauma e.g. chipping or loosening of teeth occurs in up to 6.5% of laryngoscopies 1. A patient with prominent upper incisors, caries, periodontal disease, dental fillings, implants, crowns, and gaps between the front teeth (Figure 2) is particularly at risk. Refer patients with dental disease for preoperative dental assessment. Always use a dental guard to protect the teeth (Figure 3). Ask a dentist to make a customised guard for patients with abnormal teeth (Figure 4) or fashion one in the operating room from thermoplastic sheeting (Figures 5a, b).

Gum trauma: Avoid trauma in edentulous patients by covering the upper gum with a cotton swab.
Unstable cervical spine, rheumatoid or osteoarthritis or prior neck surgery or injury: Avoid spinal and neurological injury by requesting flexion-extension cervical X-rays, and obtain an expert opinion if there are any concerns.
Mucosal tears of the pharyngeal arches and tonsillolingual sulci: These occur not uncommonly in cases with difficult access due to forceful upward suspension of the laryngoscope.
Lingual, glossopharyngeal and hypoglossal nerve injury: It has been reported that minor alterations relating to taste occur in 18%, subjective swallowing complaints in 16% and partial tongue numbness in 13% of patients following suspension laryngoscopy due to traction injury of the lingual and glossopharyngeal nerves; average duration of neurological fallout is 11 (6-34) days 2. Klussmann reported 4 cases of hypoglossal injury in a series of 339 cases of suspension laryngoscopy 1. It is more likely to occur with prolonged procedures e.g. transoral laser microsurgery for tumour resection.
Ischaemic injury of the tongue: With prolonged transoral microsurgery one should intermittently release the laryngeal suspension.
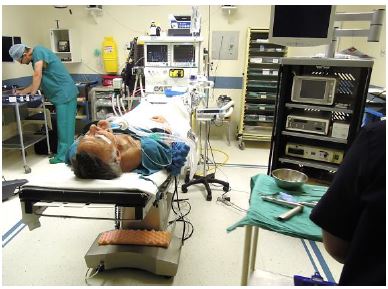
Operating room setup
A typical setup has the anaesthetic machine placed either at the patient’s feet or to the patient’s side to allow unrestricted access to the head; this may require extensions for anaesthetic tubing and intravenous lines (Figure 6).
Anaesthesia
The principal anaesthetic challenges are to intubate a difficult airway (tumour, trismus, stridor, bleeding etc.), to allow the surgeon to work in the confined space of the larynx and pharynx, and to permit access to the trachea and bronchial tree.
It is crucial that the surgeon examines the patient’s upper airway preoperatively to forewarn the anaesthetist about anatomical distortions, and that there is agreement between surgeon and anaesthetist about how to maintain the patient’s airway.
The airway may be maintained in a number of ways
- Nasal or oral endotracheal intubation with a small (6mm ID) tube (authors’ preference)
- Intermittent jet ventilation
- Intermittent extubation with endoscopy during apnoeic intervals
- Open airway
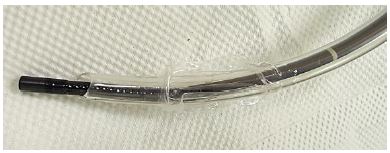
- Spontaneous breathing of anaesthetic gases administered through the suction port of the laryngoscope (Figure 9)
- Intravenous anaesthesia
- Tracheostomy
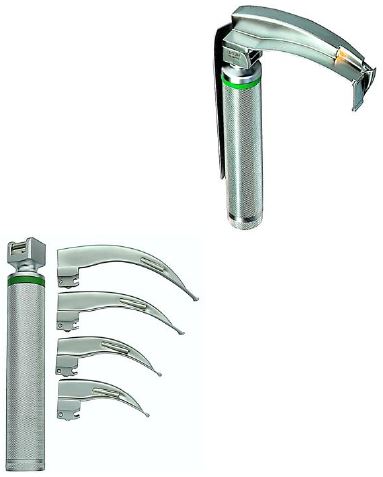
The surgeon must remain at the patient’s side from the time of induction until the patient has been extubated and is breathing freely. The laryngoscopy instruments, light source, light cable and suction must be close at hand in case the anaesthetist is unable to intubate the larynx due to poor access or bleeding. Occasionally the surgeon may use the anaesthetist’s Macintosh laryngoscope to obtain a panoramic view to visualise a lesion, to remove foreign bodies from the pharynx or larynx, or to direct the bronchoscope into the larynx (Figure 7).
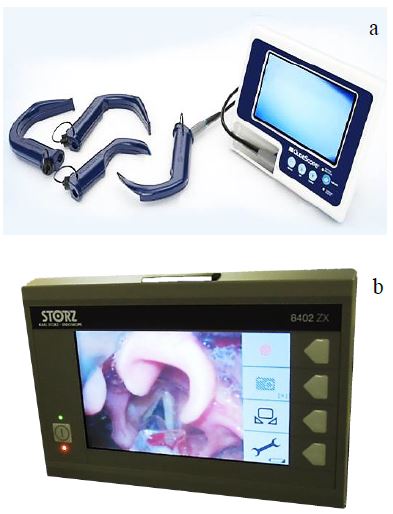
Fibreoptic laryngoscopes project the image of the larynx onto a small screen and may improve access with difficult intubations (Figures 8a, b).
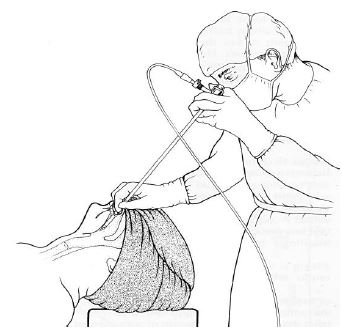
Another option is to intubate a patient over a fibreoptic bronchoscope. This is done either with the patient awake and the upper airway anaesthetised with topical agents, or in a patient whose airway can be maintained with mask ventilation. A flexible bronchoscope is advanced through the endotracheal tube; the tip of the bronchoscope is advanced into the larynx and trachea and the endotracheal tube is railroaded over the bronchoscope (Figure 9).
When it is anticipated that an emergency tracheostomy may be required for a difficult intubation, then the surgeon should anaesthetise skin, subcutaneous tissues and trachea with local anaesthesia and vasoconstrictor, have the tracheostomy set ready, and scrub and gown before general anaesthesia is commenced.
Direct Laryngoscopy
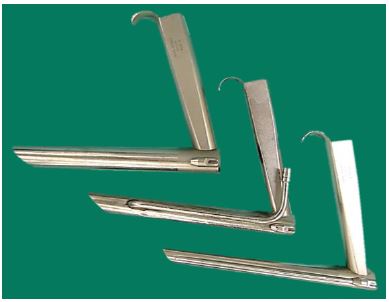
Instrumentation
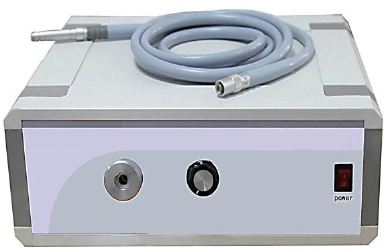
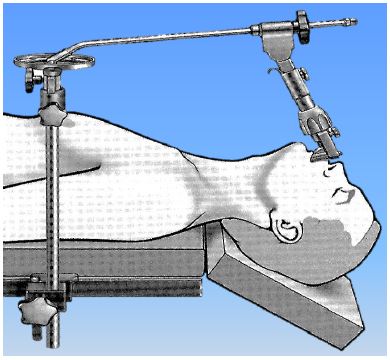
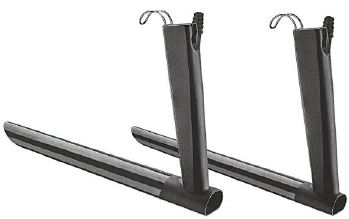
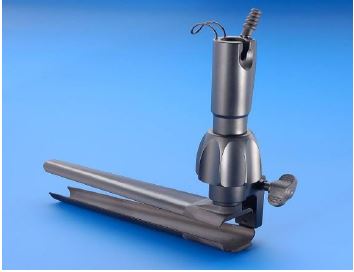
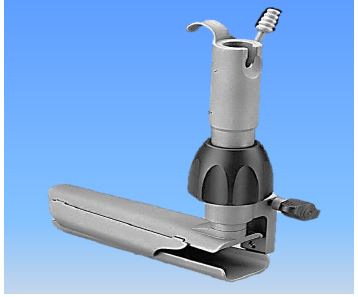
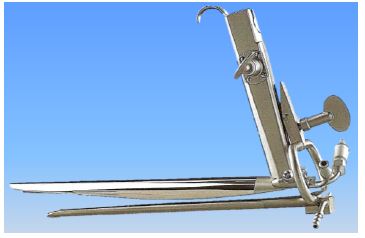
To view the entire larynx and pharynx requires a range of laryngoscopes (Figure 10). Employ the largest laryngoscope to maximise exposure. Larger laryngoscopes are used to access endolaryngeal, upper tracheal and hypopharyngeal lesions; smaller diameter laryngoscopes provide access for difficult exposures e.g. the anterior commissure of the larynx, subglottis and upper trachea (Figure 10). Light is delivered by a light source, and is transmitted via a fibreoptic light cable to a light carrier that it attached to the scope (Figures 11, 12a, b). The light carrier is inserted into a slot on the inside of the laryngoscope (Figure 12a), or clipped onto the laryngoscope (author’s choice as it is more robust) (Figure 12b). To perform microsurgery the laryngoscope is suspended in a fixed position with a laryngoscope holder (Figures 12, 13).
The chest piece of the holder is rested on a plastic/wooden board on the chest to distribute the pressure over the chest wall; alternatively a laryngoscope holder with an adjustable supporting plate which is attached to the side of the operating table can be used to avoid pressure being applied to the chest (Figure 14).
When employing CO2 laser, laryngoscopes with matt finishes are used to avoid the laser beam being deflected off the metal (Figure 15).
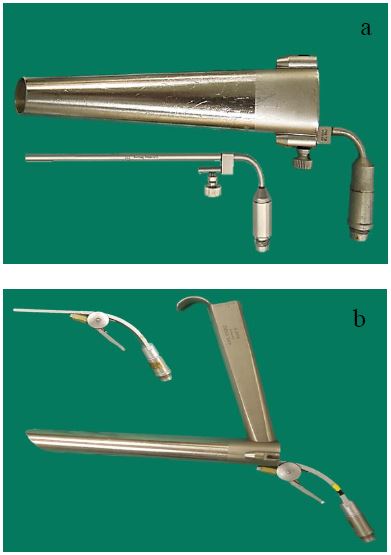
Distending laryngoscopes are used to resect tumours in the hypopharynx, supraglottic larynx and base of tongue with CO2 laser (Figures 16, 17).
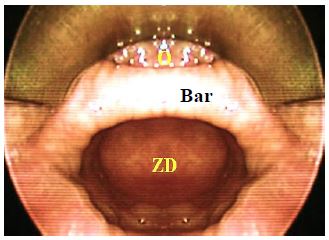
A Weerda diverticuloscope is used for endoscopic divertilostomy of Zenker’s diverticula and to resect carcinoma of the hypopharynx with CO2 laser that extends to the upper oesophagus (Figure 18).
Laryngoscopy technique
- Place the patient in a supine position
- Ensure that the back of the head is well supported on the operating table (especially in old patients with limited neck extension)
- Elevate the head and flex the neck to allow better exposure for laryngoscopy and to reduce pressure of the laryngoscope on the oropharyngeal walls
- Sit down at the head of the table and adjust the table to a comfortable height
- Select the appropriate laryngoscope (largest that is likely to be suitable)
- Apply aqueous gel to the laryngoscope
- Cover the upper teeth with a dental guard (cotton swab if edentulous)
- Insert the laryngoscope, protecting the lips from injury with the fingers of the non-dominant hand (Figure 19)
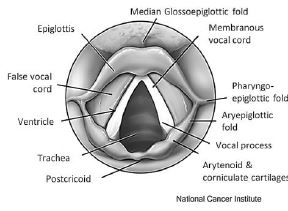
- Keep in the midline while advancing the laryngoscope and sequentially identify base of tongue, vallecula, epiglottis, posterior pharyngeal wall and arytenoids
- Identify the endotracheal tube; keeping the tube in view posteriorly, advance the tip of the scope until the vocal cords come into view
- Initially inspect the upper aerodigestive tract not involved by tumour to avoid traumatising tumour and obscuring the field with blood
- Fully inspect the larynx by moving the tip of the scope and moving the larynx with the non-dominant hand placed externally on the neck (Figure 20)
- Inspect the posterior part of the larynx by directing the tip of the scope behind the endotracheal tube
- The subglottis can be inspected by passing a Hopkin’s rod through the laryngoscope
- Take special care not to overlook pathology on the laryngeal surface of the epiglottis (can be difficult to see) by pressing down on the larynx with the non-dominant hand while slowly retracting the laryngoscope
- Inspect the pyriform fossae and postcricoid regions of the hypopharynx
- Inspect the valleculae and base of tongue
- Proceed to oesophagoscopy and bronchoscopy before taking tissue biopsies of laryngeal or hypopharyngeal pathology to avoid the field becoming obscured with blood
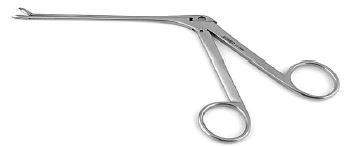
- Biopy a suspected tumour with long Blakesley-like forceps (Figure 21); using microinstruments may yield specimens that are too small and cause a pathologist to understage an invasive cancer
- Bleeding from mucosal trauma or biopsies settles spontaneously; only very rarely is haemostasis with adrenaline-soaked gauze or with cautery required
Rigid oesophagoscopy
The oesophagus may be examined by flexible (transoral or transnasal) or rigid oesophagoscopy. In worldwide practice, most diagnostic examinations are generally performed by flexible endoscopy (usually a flexible gastroscope) where equipment is available. It offers the advantage of performance under topical anaesthetic with intravenous sedation thereby avoiding general anaesthesia. It gives superior inspection and allows complete endoscopy of the full length of the oesophagus including the oesophagogastric junction. In addition, it avoids many of the inherent hazards involved in rigid oesophagoscopy. Many therapeutic procedures such as oesophageal dilation and stent placement involve the addition of radiological imaging. Conversely, certain therapeutic procedures such as foreign body removal may be better achieved with a rigid oesophagoscope. Optimally, the operator should be familiar and proficient with both modalities.
In otolaryngology, most pathology is located in the cervical oesophagus, where the use of short rigid scopes is adequate and expedient when combined with other procedures. For the mid- and distal oesophagus, flexible endoscopy holds a distinct advantage.
Endoscopic anatomy
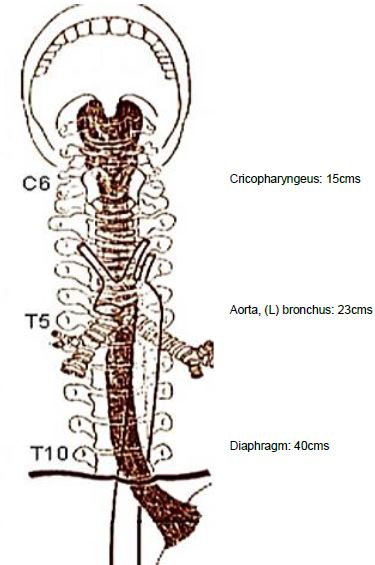
The oesophagus is a 25cm long muscular tube lined by a delicate, non-keratinized stratified squamous epithelium that traverses the neck, superior and posterior mediastinum. In the neck it is located immediately behind the trachea and anterior to the prevertebral fascia, and the 6th - 8th cervical vertebrae; laterally are the contents of the carotid sheaths and the thyroid lobes. In the superior mediastinum it veers slightly to the left before returning to the midline (Figure 22). It passes behind the aortic arch and to the right of the descending aorta until it reaches the inferior mediastinum where it passes anterior and slightly to the left of the aorta before traversing the diaphragm (Figure 22). Anteriorly it abuts trachea, right pulmonary artery, left main bronchus, pericarddium, left atrium, and diaphragm. Posteriorly it is related to the vertebrae, the thoracic part of the aorta, and diaphragm.
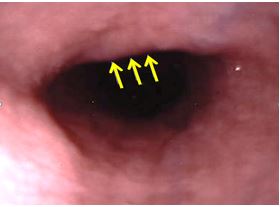
Three points of external compression are visible at oesophagoscopy i.e. aortic arch, left main bronchus and diaphragm (Figure 22). The left main bronchus crosses the oesophagus anteriorly and indents it below the aortic arch (Figure 23).
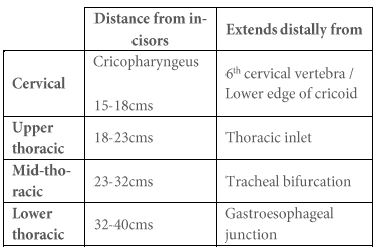
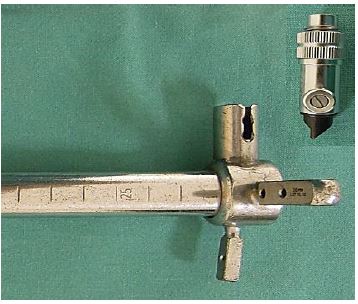
Pathology seen at rigid oesophagoscopy is recorded as its distance from the upper incisors (Figure 22, Table 1). The distance markings are etched onto the outside of the scopes (Figures 22, 24).
Instrumentation
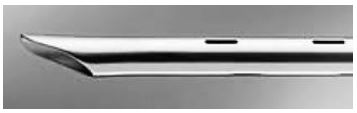
Basic rigid oesophagoscope design dates back over a century. In it crudest form it is a hollow tube with a light on the end. Many variants are in common use attesting to their almost indestructible nature. Evolution incorporates fiberoptic wave guides and prismatic lenses (Figure 24).
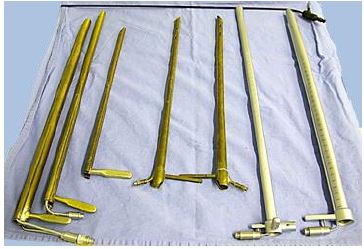
More modern designs have smooth bevelled edges and prismatic wave guides to maximise the size of the working channels (Figures 25, 26). Because otolaryngologists generally deal with pathology in the cervical and upper/mid-thoracic oesophagus, a 25cm rigid scope is usually adequate (Figures 25, 26).

Only use a longer scope for pathology located in the distal oesophagus. Use a scope with a bevelled, smooth, rounded end. Both adult and paediatric sized scopes are available; select a larger size if possible as it transmits more light, one can see better, and it is less likely to perforate the oesophageal wall.
Indications
Some of the indications listed below may be addressed by flexible oesophagoscopy. The limitations of flexible endoscopy are examining the postcricoid region and upper oesophageal sphincter, as these areas cannot be insufflated with air.
Indications include to:
- Exclude 2nd primaries in patients with squamous cell carcinomas of the upper aerodigestive tract
- Remove foreign bodies
- Biopsy, dilate or stent tumours
- Determine the distal extent of hypopharyngeal and oesophageal carcinoma
- Dilate strictures
- Exclude traumatic perforations with penetrating injury of the neck
- Inject oesophageal varices
Preoperative evaluation
A good history may alert a surgeon to the possibility of a pharyngeal pouch which is easily perforated as the oesophagoscope naturally enters a pouch. Chest X-ray is done to exclude a deviated oesophagus and an aortic aneurysm. In patients with dysphagia, a contrast oesophagogram serves as a roadmap for the endoscopist.
Oesophagoscopy technique
Perforating the oesophageal wall with a rigid oesophagoscope is a life-threatening event. Hence rigid oesophagoscopy should be done with extreme caution and with a delicate touch; it also requires clinical judgement as to when to abandon the procedure or call for expert assistance.
- Place the patient in a supine position
- Ensure that the back of the head is well supported on the operation table (especially in old patients with limited spinal extension)
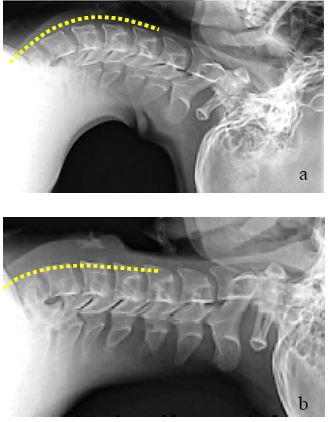
- The proximal oesophagus follows the lordosis of the cervical and thoracic spine; bring the cervical spine into a straight line with the thoracic spine by elevating the head (Figures 27a, b)
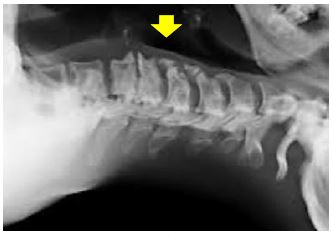
- Prominent osteophytes may impair advancement of the scope and make traumatising the mucosa more likely (Figure 28)
- Sit down at the head of the table and adjust the table to a comfortable height
- Cover the upper teeth with dental guard (cotton swab if edentulous)
- Select the appropriate oesophagoscope (largest that is likely to be suitable)
- Apply aqueous gel to the oesophagoscope
- Insert the oesophagoscope, protecting the lips from injury with the fingers of the non-dominant hand (Figure 29)
- Use the thumb of the non-dominant hand as a fulcrum for the oesophagoscope to protect the teeth (Figure 29)
- Keeping in the midline, advance the oesophagoscope and identify the posterior pharyngeal wall; advance the scope along the posterior pharyngeal wall while remaining in the midline
- Alternatively, with the neck extended, pass the scope via the right corner of the mouth and floor of mouth, and follow the lateral wall of the right pyriform fossa to its full depth. Readjusting the scope to the midline engages the larynx and elevating it anteriorly usually exposes the cricopharyngeus
- The most difficult step for an inexperienced
endoscopist is to advance the scope through the upper oesophageal
sphincter (cricopharyngeus)
- The hypopharynx tapers down to the oesophagus like a funnel with the larynx suspended anteriorly
- The scope comes to a dead-stop and the pharyngeal lumen disappears as one reaches the cricopharyngeal sphincter
- Ensure that the bevel of the scope is pointing upwards
- Elevate the tip of the scope against the posterior surface of the cricoid with the non-dominant thumb
- Look for the oesophageal lumen to appear while applying steady, firm pressure against the contracted cricopharyngeus
- Slowly advance the tip of the scope while always keeping the lumen in view
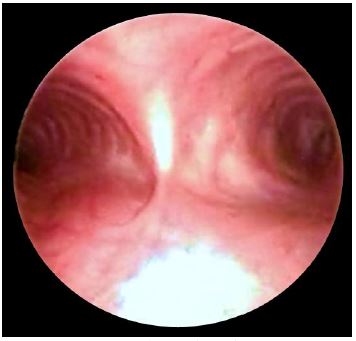
- Always consider the possibility of a pharyngeal pouch
(Zenker’s diverticulum) which is easily perforated (Figures
30, 31)
- A pharyngeal pouch is located immediately behind the upper oesophageal sphincter
- Finding the oesophageal lumen may be very challenging
- A scope will always automatically enter a pouch
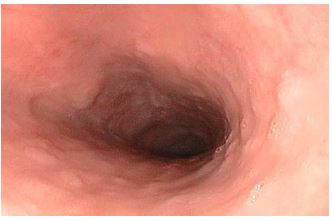
- Advance the scope down the cervical oesophagus, always keeping the lumen in view while advancing the scope (Figure 32)
- Use a long metal sucker to clear oesophageal contents
- A tightly inflated endotracheal tube cuff may compress the oesophagus; deflating it may make passage of the oesophagoscope easier
- Once the oesophagoscope has been passed all the way, carefully inspect the oesophagus for pathology and for mucosal trauma while slowly retracting the scope
- Biopsy lesions with long biopsy forceps
Complications of oesophagoscopy
Mucosal tears/lacerations
Minor tears and lacerations can be ignored; if in doubt about the clinical significance, institute antibiotics and nasogastric tube feeding and monitor the patient carefully.

Oesophageal perforation
This is a surgical emergency and has significant morbidity and mortality, especially if not promptly recognised and managed. Leakage of oesophageal and gastric content into the mediastinum rapidly leads to mediastinitis, sepsis and multiorgan failure. Clinical pointers include pain in the chest, back and neck, odynophagia, dysphagia, tachycardia, tachypnoea, pyrexia, crepitus and signs of sepsis.
Management includes:
- Nil per mouth
- Broad spectrum antibiotics
- Haemodynamic stabilisation and intensive monitoring
- Confirm the diagnosis
- Chest X-ray
- Gastrograffin swallow
- Decision-making about the need for surgical intervention
- Nasogastric tube or parenteral feeding
- Conservative/non-operative management may be considered with highly selected perforations that have been promptly diagnosed, mainly of the cervical oesophagus, in stable patients with no evidence of systemic sepsis and where there is minimal extraoesophageal contamination
- Surgical options include
- Simple external drainage to create a controlled fistula, allowing it to heal spontaneously (only if there is no distal obstruction)
- Primary repair and external drainage of extra-oesophageal contamination
- Primary repair with bolstering of the repair with a pedicled soft tissue flap e.g. pectoralis major or infra-hyoid strap muscle
- Oesophageal diversion and drainage
- Oesophageal stenting
- Oesophagectomy
Drainage +/- repair of a cervical oesophageal perforation
- Palpate the cricoid as it marks the proximal end of the cervical oesophagus
- Make a transverse skin crease incision at the level of the cricoid, usually on the left side; or an incision along the anterior border of sternocleidomastoid in the lower neck
- Elevate subplatysmal flaps
- Incise the fascia along the anterior margin of the sternocleidomastoid
- Reflect the sternocleidomastoid laterally to expose the carotid sheath
- Identify and divide the omohyoid muscle
- Retract the thyroid gland and larynx to the contralateral side
- Identify and divide the middle thyroid vein
- Palpate the trachea; the oesophagus is immediately behind the trachea
- Carefully dissect bluntly behind the oesophagus along the retropharyngeal space
- Take care not to injure the recurrent laryngeal nerve which is located in the tracheoesophageal groove
- Drain the sepsis by dissecting bluntly with a finger behind the oesophagus along the prevertebral fascia into the superior mediastinum
- Debride devitalised tissue
- Identify and repair the perforation usually in two layers as a complete mucosal repair is essential. A second muscularis layer is approximated over this. Use absorbable suture material for the repair.
- Use a sternocleidomastoid or infra-hyoid strap muscle flap to bolster the repair and drain the area
- If the perforation is not visible or suitable for repair, then drain the perforation externally +/- a muscle flap over the defect
Removing oesophageal foreign bodies
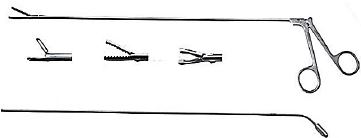
Foreign bodies often impact at sites of anatomical (upper oesophageal sphincter, aortic arch, diaphragmatic hiatus) or pathologic narrowing (diverticulae, webs, strictures, achalasia, and tumours) of the oesophagus. A foreign body may be apparent on plain x-ray or CT scan, although not all are radio-opaque. Endoscopy is often required on clinical grounds even in the setting of negative radiographs. Contrast studies e.g. barium swallow are avoided as they may impair endoscopic visualisation. Oesophagoscopy should be done as soon as possible and not be delayed beyond 24hrs as delay can cause strictures or perforations. Before passing the scope the operator should ensure that a suitable range of grasping forceps is available (Figure 33).

Large pieces should be grasped and impacted into the end of the scope, removing the scope and impacted material simultaneously. Alternately soft material can be removed piecemeal through the lumen of the scope. Avoid the temptation to try and push the obstructing material down the lumen as this may complicate removal or cause perforation. Always repass the scope beyond the site of the obstruction once the foreign body has been removed to rule out traumatic injury and predisposing causes such as tumours, strictures etc.
Foreign bodies can also be removed with flexible endoscopy through the use of snares and other purpose built grasping forceps. Pushing a foreign body down the lumen may be appropriate in some instances if the scope can be passed beyond the obstruction first to establish the feasibility of such a manoeuvre. Flexible endoscopy may be very useful if anatomical restrictions preclude passage of a rigid scope.
Dilating oesophageal strictures
Oesophageal dilatation has a higher risk of oesophageal perforation than routine oesophagoscopy, and should be performed by an experienced endoscopist. It is indicated for symptomatic benign (anastomotic, sclerotherapy, radiation, corrosive) and malignant strictures. The aetiology should first be determined by contrast oesophagography and endoscopy. Barium swallow provides a roadmap of the stricture for the endoscopist and is especially valuable with long, tight, and complex strictures. Bougienage may cause bleeding; therefore anti-coagulants should be stopped prior to the procedure.
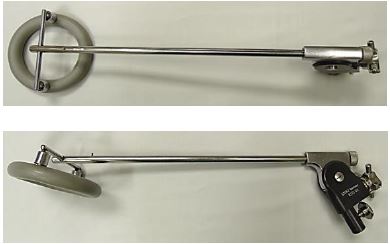
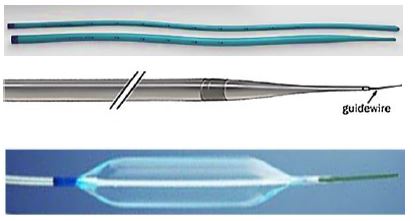
Two dilatation methods are used: push dilators/bougies and balloon dilators (Figure 34). Push dilators may be poly-vinyl bougies, weighted (mercury/tungsten filled rubber bougies), or wire guided. Polyvinyl dilators comprise a range of polyvinyl rods (5-20mm diameter) with rounded and tapered tips. Some have a radiopaque band at the widest point of the dilator to aid radiological localisation. These are typically passed over a guide wire that has been passed beyond the obstruction (preferably into the stomach) under x-ray imaging.
The amount of dilation required is determined by the nature of the stricture and the amount of resistance encountered. Rather serially dilate a stricture at multiple sittings than aggressively dilate it with the associated risk of causing a perforation.
Balloon dilators are passed through a scope or are wire-guided. Balloon sizes range between 6-40mm. They are however single use (unless reused for the same patient) and expensive.
Rigid Bronchoscopy
Anatomy of tracheobronchial tree

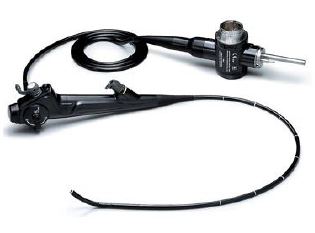
Flexible bronchoscopy is the preferred way to visualise the bronchial tree as it is less invasive, provides better access to the peripheral airways and to the upper lobes, and can be done under local anaesthesia. Flexible bronchoscopes differ from flexible gastroscopes such that they are smaller in size, only flex and extend in one plane requiring they be rotated to provide complete visualisation. The working channel is often smaller leading to easy occlusion if used where there is bleeding or pus. Biopsy forceps are also small and may lead to superficial sampling unless numerous biopsies are taken. Newer models have built in CCD camera chips and can be even more slim with larger working channels and permit on-screen visualisation as well as image capturing. Slim-line portable scopes (Figure 36) allow transnasal upper airway examination either at the bedside or in the examination room. They are optimal for quick examination but are of limited therapeutic use.
Flexible endoscopy equipment is expensive to purchase and repair. The scopes are delicate and one either needs a large budget or very careful restricted use to make it a cost-effective approach.
Flexible bronchoscopy is preferred for:
- Full examination to the distal trachea-bronchial tree
- Assistance in difficult intubation
- Assistance in percutaneous tracheostomy
- Assessment of dynamic airway obstruction with spontaneous ventilation
Rigid bronchoscopy is particularly beneficial for:
- Acute airway obstruction due to intra-luminal pathology; it is a quick procedure while maintaining airway patency and ventilation
- Pathology requiring debulking, dilation or stenting
- Removing foreign bodies
- Screening for 2nd primaries as part of a panendoscopy procedure
- Massive haemoptysis
- Large endobronchial biopsies
- Ablative surgery i.e. mechanical, laser, electrocautery, cryotherapy
- Stenting the airway for obstruction, tracheomalacia, tracheoesophageal fistulae
- Balloon tracheobronchoplasty
Rigid bronchoscopy equipment
There are numerous manufactures of high grade rigid bronchoscopes. Most are variations of a simple tubular line with a fiberoptic or transmitted prismatic light source. The selection of the type of scope may be purpose driven whether it be for diagnostic or therapeutic intent. The basic equipment includes >2 sizes of bronchoscopes, suctioning cannulae, and a variety of biopsy forceps and telescopes.
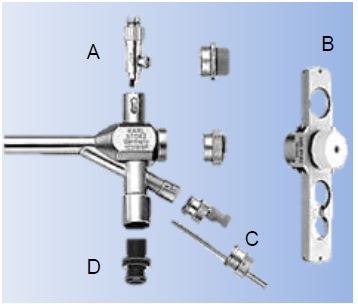
A rigid bronchoscope is a stainless steel tube through which a rigid telescope can be passed (Figure 37). The distal end is bevelled to lift the epiglottis and to pass between the vocal cords; it can also be used to core out tumour or to twist the scope through a tight stenosis (Figure 38). Slits in the distal wall of the bronchoscope allow ventilation of the contralateral lung while one of the main bronchi is intubated (Figures 37, 38). The proximal end of the bronchoscope has a central opening and ports to accommodate a range of accessories, a side-port for ventilation, and a port that permits passage of instruments, catheters and guidewires down the scope (Figure 39). Bronchoscopes come in different lengths and diameters; the most commonly used sizes in adult practice have a 6-9mm external diameter and are 40 cm in length.
A light source is connected by a fiberoptic cable to the light carrier (Figure 39 A) or the light is transmitted down a fiberoptic bundle in the sidewall of the scope. A Hopkins rod rigid telescope is passed through the central opening of the bronchochoscope (Figure 40).


Use a larger (>6.5mm) bronchoscope if possible as the optics are better with a larger (5.5mm) telescope; when using a <6.0mm bronchoscope one has to use a 2.8mm telescope. To view all the bronchial subdivisions, angled telescopes or a flexible bronchoscope is passed down the rigid bronchoscope. Either the endoscopist looks directly through the lens, or a camera is attached and the image is projected onto a monitor. Accessories include a variety of forceps, scissors, suction catheters, cautery, injection needles and stents (Figure 41).
Anaesthesia
- The airway is shared by the anaesthetist and the endoscopist; therefore close communication and cooperation are essential
- Supine position
- General anaesthesia
- Induction is via inhaled sevoflurane (usually in critical airway stenosis) or by intravenous agents
- Muscle relaxants are commonly used during insertion of the bronchoscope
- Ventilation
- Spontaneous-assisted ventilation
- Jet ventilation overcomes increased airway resistance associated with using a telescope, but carries an increased risk of barotrauma if expiration is obstructed
Finding the larynx and vocal cords
- Select the largest suitable bronchoscope
- Place the patient's head on a pillow and extend the neck (sniffing or intubating position) (Figure 29)
- Introduce the bronchoscope in the midline in a vertical plane to the floor with the long end of the bevel facing anteriorly
- Avoid trauma to the upper teeth and lower lip by sliding the scope over the thumb or use a dental guard; avoid using the upper teeth as a fulcrum to lever the bronchoscope (Figure 29)
- Advance the scope in the midline and identify the epiglottis
- Lift the epiglottis anteriorly with the tip of the bronchoscope
- Identify the posterior laryngeal inlet i.e. the arytenoids and posterior vocal cords; this can be difficult due to the restricted view through the narrow lumen of the bronchoscope.
- Tips to simply finding the laryngeal inlet include:
- Insert a Hopkins rod into the scope ab initio
- Elevate the epiglottis with the anaesthetist’s laryngoscope (Figure 7)
- First insert and suspend an operating laryngoscope (Figure 14) and pass the bronchoscope through it
- Follow the endotracheal tube into the larynx
Passing between the vocal cords
- Remove the pillow and extend the patient's head
- Sit down on a mobile stool and adjust the operating table to a comfortable height
- Rotate the bronchoscope clockwise through 900 keeping the longer edge of bevel to the right side
- Advance the scope with the tip of the bevel directed between the vocal cords and slide the shorter edge of bevel against the left vocal cord
- Avoid traumatising the right cord with the tip of the bevel
Passing along the trachea and entering the main bronchi
- Rotate the scope back through 90°
- Advanced it into the lower trachea
- Identify the carina (Figure 42)
To enter either bronchial system, rotate the patient’s head towards the contralateral shoulder and advance the scope. Segmental airways are difficult to examine unless an angled telescope or flexible bronchoscope is passed through the rigid bronchoscope.
Left bronchial tree
- Move the bronchoscope into the right corner of the mouth
- Turn the patient's head to the right side
- Advance the scope down the left main bronchus
- The lingular and lower lobe bronchi are readily seen
- Pass a telescope or flexible scope through the bronchoscope to visualise segmental and subsegmental bronchi
- An aortic arch aneurysm is a contra-indication to passing a rigid bronchoscope down the left main bronchus
Right bronchial tree
- Transfer the bronchoscope to the left corner of the mouth
- Turn the patient's head to the left
- Advance the scope down the right main bronchus
- The right main bronchus, the bronchus intermedius and lower lobe are relatively easily seen
- To examine the anteriorly placed orifice to the middle lobe, the patient's head may need to be further extended
- Pass a telescope or flexible scope via the bronchoscope to visualise the segmental and subsegmental bronchi
Exiting the airway
Carefully re-examine the airway while gently removing the bronchoscope
References
- Klussmann JP, Knoedgen R, Wittekindt C, Damm M, Eckel HE. Complications of suspension laryngoscopy. Ann Otol Rhinol Laryngol. 2002 Nov;111(11):972-6
- Rosen CA, Andrade Filho PA, Scheffel L, Buckmire R. Oropharyngeal complications of suspension laryngoscopy: a prospective study. Laryngoscope. 2005 115(9):1681-4
- Daniel P Raymond DP, Jones C, MD Surgical management of esophageal perforation: http://www.uptodate.com/contents/surgical-management-of-esophageal-perforation
Editor & Author
Johan Fagan MBChB, FCORL, MMed
Professor and Chairman
Division of Otolaryngology
University of Cape Town
Cape Town,
South africa
johannes.fagan@uct.ac.za