Plaster of Paris casts
by Nicholas Kruger & Pieter Venter
Learning objectives
- Know the different clinical applications of plaster of Paris.
- Know the steps in the application of a plaster of Paris cast.
- Understand what the basic set of upper and lower limb casts are and when to apply them.
- Describe the different braces used in orthopaedic surgery.
Introduction
The correct application of plaster of Paris (POP) is a necessary skill for any clinician. It still has a definite place in managing orthopaedic injuries, even in the age of modern surgical advances.
It is widely used pre-operatively for temporary immobilisation and stabilisation of fractures, post-operatively for protection of fixation and soft tissue resting, correcting deformities and definitive management of specific injuries.
The origin of the name plaster of Paris is because the quarries from which it was mined were near Paris in France.
When POP is mixed with water, the more soluble calcium sulphate returns to its insoluble form, giving off heat and cool to cold water should be used for the mixture to limit the chance of thermal injury.
After application and moulding, it is imperative to maintain the position you wish to obtain for three to five minutes, which is how long the POP will take to set initially after wetting. After that, the plaster will ultimately harden after 36 – 48 hours.
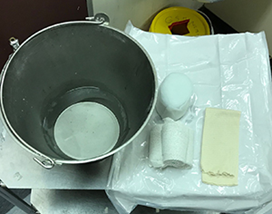
Skill: Plaster of Paris application Setup
Preparation is crucial. Gather all the necessary components together (number of rolls of POP, water, cotton padding, OrthoWool™ and so on) before starting the procedure.
Note: all wounds need to be adequately dressed/covered before application of a cast.
Step 1: Examination
Do an examination of the limb to be splinted.
- Neurovascular examination.
- Quality of skin in the area where the plaster will be applied (for example, wounds, blisters, bruising).
- Ensure that radiographs of the limb (plus the joints above and below) have been reviewed.
Step 2: Positioning
The patient and the person applying the plaster should both be comfortably positioned for the procedure. The limb that is to be placed in the cast should be held in the correct position. Specific casts need more than one set of hands, so get an assistant to help.
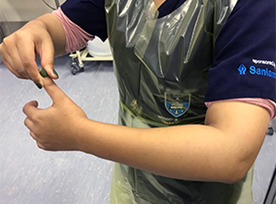
Step 3: Stockinette
If available, use Stockinette to cover the skin of the affected limb, 3–4 cm longer at the ends so it can be folded back under the POP.
Step 4: Cotton wool padding
Starting distally, wrap the padding proximally and overlap each layer by 50%.
Apply additional padding over areas with bony prominences.
Use a ‘figure of 8’ technique around joints to prevent wrinkling and unnecessary compression (for example, around the elbow to prevent cubital fossa pressure).
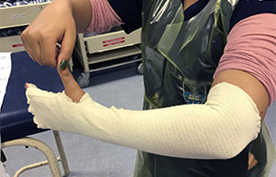
Step 5: Plaster application
Ensure that the limb is in the correct position for applying the cast.
Soak the plaster roll in the bucket of water until bubbles cease to rise, remove from the water and gently squeeze the excess water from the roll, without drying it thoroughly.
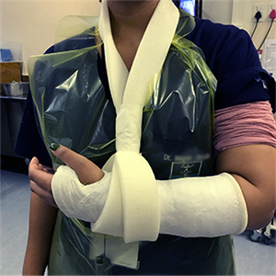
Apply the POP on top of the cotton wool padding from distal to proximal, without applying tension to the roll, overlapping each layer by 50%. Use the ‘figure of 8’ technique around joints and prevent wrinkling of the plaster by smoothing the layers down with your palm. Ensure immobilisation of the joints above and below the injury. A slab splint (back slab) is usually applied and secured with a cling bandage to allow for swelling in the acute setting.

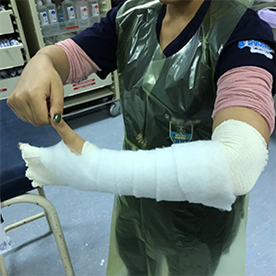
Step 6: Moulding the plaster
The cast must be moulded around the limb, without causing soft tissue injury to ensure adequate immobilisation and stability. When using casts to splint fractures, a three-point pressure technique must be used (one pressure point countering the apex of the fracture, one distally and one proximally on the opposite side of the fracture apex).
During this step, the limb must be correctly positioned, and the position maintained for three to five minutes for the cast to set. Also ensure that the edges are smoothed out and will not irritate nearby structures (for example, the thumb base in a forearm cast).

Step 7: Clean the limb
Clean exposed areas of skin with water and dry with paper towels.
Step 8: Repeat examination
Repeat a neurovascular examination and inspect that the cast does not hinder any movements other than those needed for injury management.
Step 9: Radiography
Repeat radiographs if any manipulation was done and to confirm the correct position of the underlying bone.
Step 10: Patient education
Counsel your patient:
- On why the cast was applied, when they should follow up and for how long they can expect the cast to stay on.
- Do not put anything down the cast to scratch; the skin might be injured and get infected.
- Do not let the cast get wet.
- Frequently move the fingers or toes of the immobilised limb.
- Elevate the casted limb to prevent swelling.
Also, counsel them on when to seek immediate medical attention:
- Increased pain and swelling.
- Numbness or increasing pressure in the casted limb.
- Unusual smell of any drainage.
- Colour change of the digits distal to the cast.
- The cast breaks or comes off.
How to remove a cast safely
- Using an oscillating electric POP cast saw, make two longitudinal cuts along opposing surfaces of the cast, avoiding areas where the bone is prominent.
- The saw cut is prgressed by ‘dabbing’ it along, not sliding, as this may scratch the skin.
- Once the vertical cuts have been made, loosed the cast with a plaster spreader.
- Complete the division of the plaster and the padding with plaster scissors, with careful attention not to injure the underlying skin.
- The saw is noisy and may scare patients, especially children. Reassure them by demonstrating the saw on your palm before applying the POP.


Plaster application images © AO Foundation, Switzerland
Source: AO Foundation Online Surgery Reference (www.aofoundation.org) Access Emergency Medicine (www.aofoundation.org)
Essential takeaways
- Proper application of a plaster cast is an invaluable skill that is still widely used in orthopaedics.
- Be aware of the setting times of POP to maintain the intended position.
- Patient education regarding POP care and danger signs.
References
- Chang, I. and Varacallo, M. (2019). Anatomy, Shoulder and Upper Limb, Glenohumeral Joint. [online] Ncbi.nlm.nih.gov. Available at: https://www.ncbi.nlm.nih.gov/books/NBK537018/ [Accessed 11 Oct. 2019].
- Elentra.healthsci.queensu.ca. (2019). Step 10: Patient instructions. [online] Available at: https://elentra.healthsci.queensu.ca/assets/modules/cast-application/step_10_patient_instructions.html [Accessed 11 Oct. 2019].
- Szostakowski, B., Smitham, P. and Khan, W. (2019). Plaster of Paris–Short History of Casting and Injured Limb Immobilization. [online] Available at: https://www.ncbi.nlm.nih.gov/pmc/articles/PMC5420179/ [Accessed 11 Oct. 2019].