Chapter 18
Curriculum adaptation for learners with visual impairments
Kofi Nseibo
Chapter learning outcomes
After completing this chapter, you will be able to:
 Discuss teaching strategies for inclusive learning in the context of learners who are blind or have low vision.
- Analyse how the principles of Universal Design for Learning (UDL) can be used to create conducive learning environments for learners with visual impairments.
- Understand the importance of the Expanded Core Curriculum (ECC) to learners with visual impairments.
- Describe and be able to recommend a range of assistive technology devices for learners with visual impairments.
- Explore the intersection between incidental learning and adaptation for learners with visual impairments.
Preparatory activities

READ:Assistive technology for learners who are blind or have low vision: A TEDI short guide
Author: Teacher Empowerment for Disability Inclusion (TEDI)
Date: 2020
Estimated reading time: 1 hour
File size: 1.7MB
Read through the resource guide, paying special attention to the section on the ECC.
READ: Practical approaches to curriculum differentiation for learners with visual impairment
Author: Hestelle Viljoen
Date: 2020
Estimated reading time: 3 hour
File size: 13.6 MB
READ: Top 10 UDL tips for designing an engaging learning environment
Author: CAST
Date: 2016
Estimated reading time: 3 hour
File size: 652 KB

ACTIVITY
Estimated time: 25 minutes
When you have read the reading materials above, respond to the following questions:
- Briefly state three things you will do when teaching children who are blind or have low vision in an inclusive classroom.
- Briefly explain what the ECC is.
- Identify 10 assistive technology devices.
Introduction
In this chapter, we continue to discuss the impact of visual impairment on learning. We discuss the application of teaching strategies for inclusive learning in the context of learners who are blind or have low vision. We shall also analyse how the principles of UDL can be used to create conducive learning environments for learners who are blind or have low vision and the importance of the ECC to these learners. Further, we shall discuss a range of high- and low-tech assistive technologies for learners with visual impairment then conclude with incidental learning.
Teaching strategies for inclusive learning in the context of learners with visual impairments
The planning, preparation and teaching of lessons that are designed to achieve a learner’s goals is the core concern of the classroom teacher. To advance their knowledge and ability to effectively engage students and enhance their learning, classroom teachers should engage in critical reflection and inquiry. Teachers have a significant impact on the lives of learners and play a variety of different roles in the classroom, including creating a welcoming environment, guiding and caring for learners, and acting as a positive role model.
It is crucial for teachers to learn how to modify the learning environment so that learners with low vision can see them more easily. Planning environmental changes requires taking into account factors like lighting, colour, contrast, size and distance, and the organisation of time and space. Keep in mind that even though children with low vision will benefit from the following suggestions, it is crucial to take into account the characteristics of the visual impairment, as discussed in Chapter 17 (whether the impact on the learner results in decreased visual acuity, a loss of central visual field or a loss of peripheral visual field) when making specific suggestions to improve vision.
We will now engage with some practical tips for enhancing teaching for inclusive learning in the context of learners who are blind or have low vision.
Illumination
Some children with low eyesight are extremely sensitive to light and glare. Where possible, teachers should use curtains to control and keep the light level in the room consistent. They should place learners next to windows to reduce glare and they should encourage children to wear hats, visors or sunglasses even while they’re inside. It is advised to let the learner sit near windows or natural light, but you should also consider the needs of other learners who need to have ample light. If lamps are used, they should be positioned behind the learner’s shoulder, opposite the writing hand and/or on the same side as the stronger eye.
Colour and contrast
High contrast images and objects may be advantageous for learners with limited eyesight. For instance, if you highlight the lines on a piece of paper with a black marker, it will be simpler to see them. The brightly coloured tray makes the white utensils easier to notice when eating lunch than on a white table. If the student uses a black pencil, pen or marker with a large nib they will be able to read their own writing more easily. Basic guidelines for using colour to create contrast include avoiding pastel colours next to each other, avoiding white and gray with other light colours, using high-contrast objects for daily activities, and using duct tape to draw attention to an object (such as the hanger where the coat is hanging). When reading, a learner can also require a typoscope. This reading shield has a rectangular opening that allows the reader to see one or more lines of print. It can be constructed out of cardboard or a black substance and helps the pupil stay on the right line while reading by reducing additional light reflected from the paper surface.
Size and distance
Magnification might also be advantageous for learners with poor eyesight. Teachers might give their learners bigger prints of maps, photos, and other visual materials. Both the learner and the item may be shifted closer to one another (for example, by moving their seat closer to the board).
Organisation of time and space
To improve the colour and contrast on doorframes, tabletops and other items of furniture, spotlights can be used to control the level of light in particular areas. Keep the space and the school supplies well organised so that the learner can easily identify them and remove unnecessary objects from the immediate working area. These actions will help reduce visual clutter in the classroom. Teachers can also give their learners a reading/writing stand, a clipboard, a standing lamp and a good chair or table to increase physical comfort and promote proper posture. Effective use of time will also be advantageous for learners with low vision. For example, when working with a material that has not been adjusted to the student’s visual needs, teachers can encourage the learner to wear their prescribed glasses (if appropriate) to reduce visual fatigue, suggest pre-arranged breaks, allow the learner to be visually focused for shorter periods of time, and offer more time when visually exploring learning materials.
Accommodation for learners with reduced visual acuity
Prescribed glasses by a physician (e.g. an ophthalmologist), magnifying (enlarging print and images), high contrast materials (such as highlighting of reading materials, stairs and entrances), and preferential seating (to get closer to an object, board, etc.) may be helpful for learners with reduced visual acuity. Teachers can remove or adjust the source of light, place the learner away from the source and/or suggest using sunglasses and hats (particularly outside) if glare sensitivity is a problem, which is typical in cases of impaired visual acuity. Teachers can also try to introduce the intended work and setting to a learner who has trouble with distance vision. When there are less items around their visual goal and a visual break is provided, the environment is visually simplified.
Accommodation for learners who have lost their central visual field
The same techniques used in the case of reduced visual acuity (described above) frequently help learners who have lost their central visual field. It is crucial to stress that these learners might see distorted images or have a central “blind spot” in their vision. These learners should be taught to visually scan, trace and follow objects by the teacher in the classroom. It is advised to teach children how to turn their gaze to make direct eye contact so that they can do so in future interactions because they also appear to avoid maintaining it.
Accommodation for learners who have lost their peripheral vision
For learners who have lost their peripheral vision, assistance may be required to learn how to gain orientation and mobility; for instance, instruction may be required in order to learn how to use a white cane.
Learners with peripheral vision loss may have to rely on their other senses to be aware of their surroundings. Teachers can encourage learners to employ a multi-sensory strategy to gather information, which is centred on paying close attention to touch and auditory input in addition to visual clues. Extreme changes in lighting should be avoided or minimised and learners should be given enough time to adjust to changes in their environment before starting activities (for instance, when going from outdoors to indoors, it may take longer for their eyes to adjust). These learners might also require additional glare-free lighting. Ideally, focussed lighting (e.g. desk/floor lamps, spotlighting) should be added to good general lighting in the classroom when undertaking specific tasks. The learner’s seat should also be positioned correctly.
A word of advice
When teachers implement the suggestions mentioned above, they give learners who are visually impaired or have low vision opportunities for greater active participation, while inspiring them to use their vision more effectively. Learners with limited vision will always appreciate the meaningful activities, the use of appropriate materials and being offered clear information through repetitive routines. It is crucial to remember that these tactics are merely suggestions. Children with low vision benefit from specific approaches that take into account their unique visual demands.
Applying UDL principles to create conducive learning environments
In this section, we will use Stratton’s (1990) principles of adaptation; after which we will engage with the principles of UDL to discuss how we can create a conducive learning environment for learners with visual impairments.
Stratton (1990) proposes a hierarchy to assist teachers when adjusting the core curriculum to facilitate inclusive learning. The model by Stratton (1990) recognises the importance of modifying the curriculum based on the learner’s individual set of needs. Stratton always proposes the use of the least restrictive methods so that learners can connect and interact with their environment as much as possible. In Stratton’s hierarchy there are four levels of curriculum adjustments (see Figure 1).
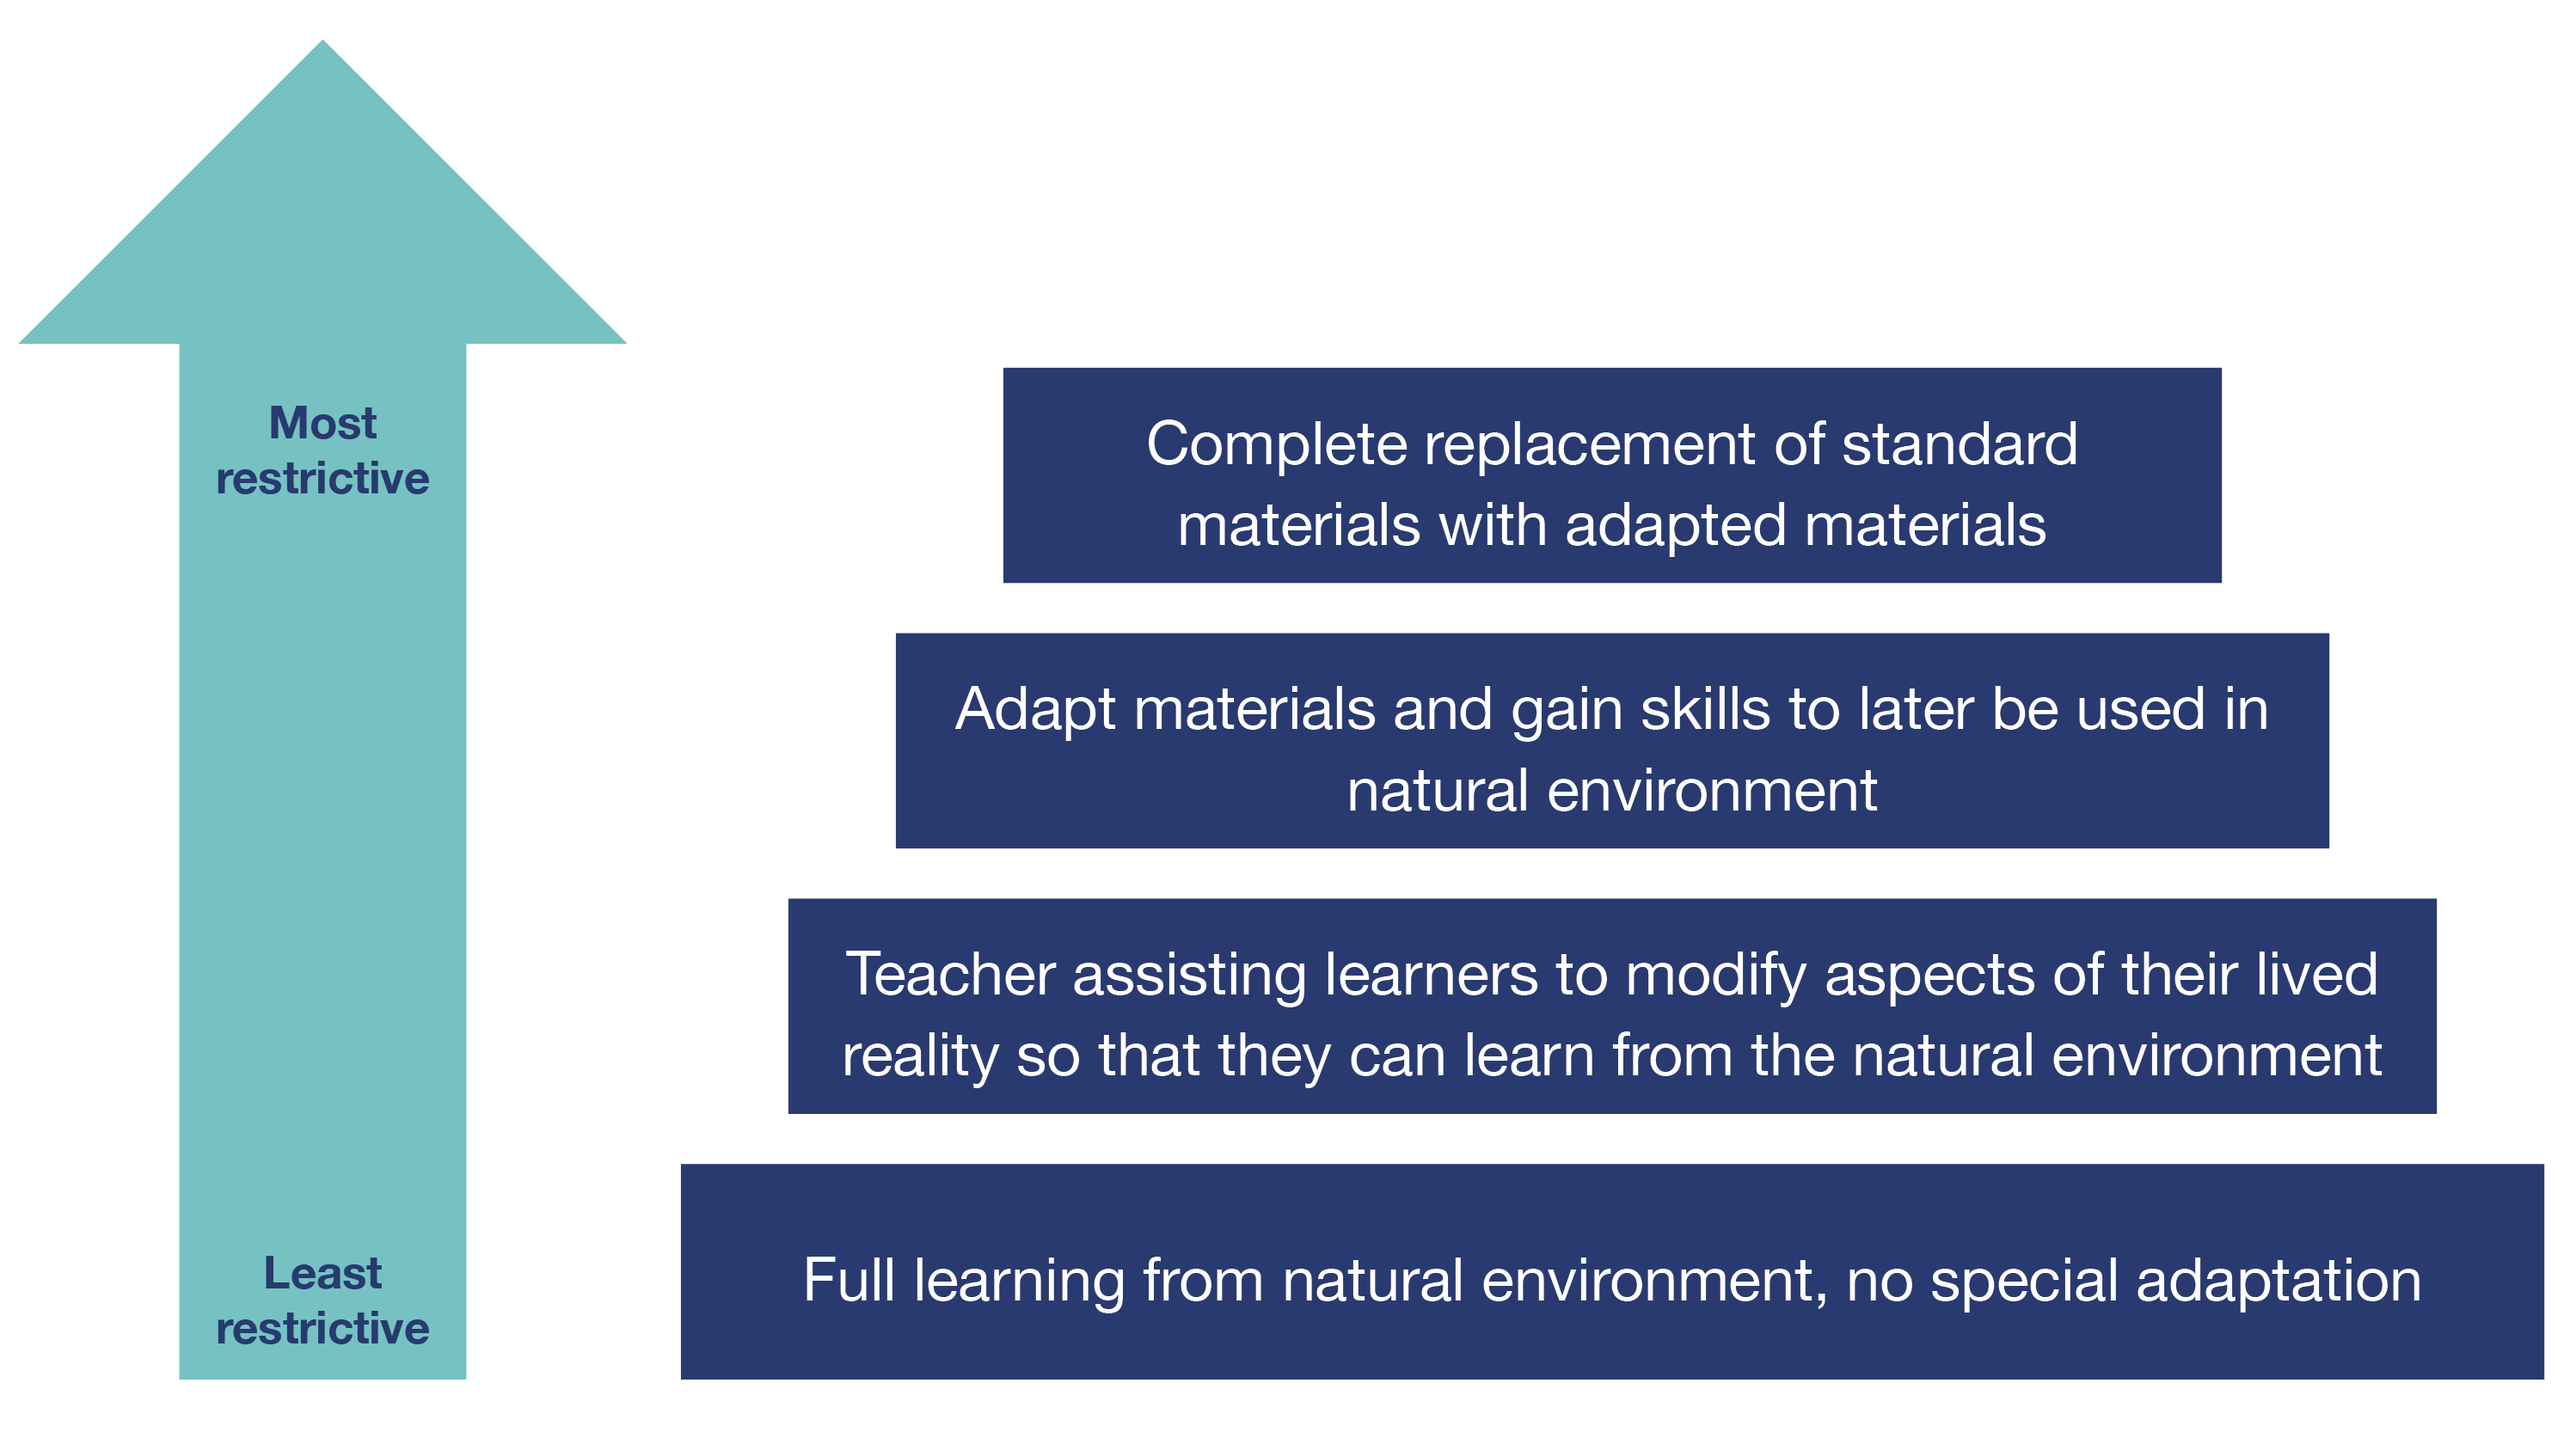
Figure 1 shows four levels of adaptation. On the far left, the vertical arrow illustrates the degree of inclusivity for each of the adaptations. The least restrictive method (on the bottom layer of Figure 1) is when the principles of UDL (Rose, 2000) are applied, in which, curriculum design provides multiple means of representation, expression and engagement to suit the needs of all learners. The teacher making accommodations for the learner to learn in the classroom is the second level. This could be in the form of written braille, larger type or magnified schematics. In the third level, curriculum and assessment must be modified to meet academic requirements. This may be necessary when the contents include complex visual elements, such as cartoons, films, learning objects, graphs and maps. At the fourth level, teachers need to consider whole new approaches, in that the curriculum needs to change completely to ensure that all learners can engage in learning if the third level still does not provide adequate access to all learners.
Let us now refresh our memory and understanding of the concept of UDL (described more fully in Chapters 11 and 12). UDL is a research-based framework or approach to teaching and learning that helps to make education accessible to all learners. The foundation of UDL is the idea that all learners’ requirements should be considered while developing, implementing and imparting learning stages and activities. It supports a set of curriculum creation guidelines that ensures all students have an equal chance to learn. UDL’s overarching goal is to expand access to learning for all learners by reducing or lowering obstacles to participation and engagement. The three overarching principles of UDL that should guide teachers, educators and curriculum designers are multiple means of representation, multiple means of action and expression, and multiple means of engagement.
Creating an accessible classroom
When setting up a classroom to accommodate a learner who is blind or visually impaired, there are a few things to keep in mind. To improve the environment, you shouldn’t be afraid to rearrange the classroom, but try to refrain from making too many changes and remember that you will need to orient the learner to the space. When the learner must be placed in specific areas in the room to provide for illumination, proximity and access to exits, it might be difficult to balance these requirements with seating arrangements that are conducive to promoting social interaction.
When other learners in the class are grouped in clusters, efforts should still be made to place learners with visual impairments with them to encourage social contact. A less cluttered classroom also encourages mobility in movement and aids students in autonomously finding and tidying up their belongings. It is therefore possible to see classroom layout as a tool for changing learner behaviour. After considering classroom positioning, the next phase is to assist the learner in “learning to look” by respecting where and how (if the learner has any useable vision) they see best and controlling environmental factors such as lighting, colour, positioning, spacing, contrast, size and detail. This will make it possible to guarantee that the learner has the modifications required for success and maximum independence. Let us now consider the following 14 steps in managing your inclusive classroom.
Step 1: The first stage in setting up the classroom is to sketch it out, taking note of any immovable features (such as windows, doors, cupboards, counters, etc.). Additionally, mark the locations of the exits and computer or phone plug points and outlets clearly with an “X” using duct tape. Generally speaking, this will determine where the teacher’s desk and any other electrical equipment will be placed.
Step 2: It is crucial to have a tidy classroom that is devoid of both physical and visible clutter. As a general rule, stay away from oversized furniture, supplies and equipment, but don’t go so far as to make the space look institutional. Make sure the designated locations for each activity are clear. Of course, the needs of a preschool class will differ from those of a class for students with various disabilities in the fourth grade or the high school. Plan your lesson taking your class’s needs into account.
Step 3: To aid the development of orientation and mobility skills for students who are mobile, arrange the furniture to provide clear traffic pathways and ensure that these routes or pathways are safe and accessible. Additionally, make sure there is enough room to manoeuvre wheelchairs, standing aids or other specific equipment. Position the furnishings so that it improves their range of motion.
Step 4: Don’t stack shelves and containers any higher than shoulder height. If the shelves and containers are not secured, this poses a safety risk in addition to blocking the view of the classroom and giving the impression of a complicated maze.
Step 5: Materials should be kept in the same place. By doing this, you and the other team members will be able to find the materials more easily and the student will know where to locate them.
Step 6: Provide adequate contrast in the furnishings, walls and flooring for learners who have low vision. When toys are left on the carpet where they can’t be easily seen by a student with low vision, a visually cluttered carpet might be problematic in terms of safety concerns. However, this sometimes cannot be regulated due to availability.
Step 7: Keep an eye out for surface variations (wood, carpet, tile, etc.) and, if there isn’t enough contrast, highlight the edges. There are numerous ways to accomplish this, in both the long and short term. You can temporarily accentuate edges by applying duct tape along their perimeter. Duct tape is now offered in a range of hues and patterns. Choose a colour with strong contrast and stay away from tape with patterns. Step edges can be painted or covered with rubber grips for a long-lasting fix. If you notice that the student constantly bumps against corners, you can tape a contrasting colour across the edge of tables and cabinets. You may also need to highlight steps, power outlets and other features using colour or contrast.
Step 8: Using varied floor textures to distinguish between carpeted and tiled spaces can be useful for learners who have little or no functional vision in order to give them additional tactile cues.
Step 9: If the learner is moving around, it is crucial to have sensory cues in the room which enable them to move by engaging with trailing surfaces. This enables them to move around the space by feeling along the edges of cupboards or tables.
Step 10: Secure any electrical cords, scatter rugs or runners, and any other objects that might constitute a safety risk to the floor with tape or tacks.
Step 11: Create landmarks to aid the development of learners’ mobility and orienting abilities. A learner with reduced vision can navigate the classroom more comfortably with the aid of carefully chosen sound, tactile, scented (but only if it is a consistent aroma) or highly visual hints.
Step 12: Place the learner’s cubby or locker at the end of the hallway or next to a prominent landmark to promote independence and orientation skills.
Step 13: Teach all learners to close or open doors completely, to push their seats beneath the table or desk when they get up and to collect their belongings when they are finished.
Step 14: Determine the learner’s ideal position and best visual field before placing them in a seat. In this regard, the learner must be situated close to an electricity outlet if they use an electronic magnifier or other electrical equipment. You also need to bear in mind that the material that the learner with a vision impairment is viewing on their electronic magnifier will be visible to other students (keep this in mind when taking any test!). The learner might also require additional space for equipment storage. Be mindful of appropriate desk and chair heights. For optimum upper body support and movement, the learner’s feet should be flat on the floor and the desk should be at a comfortable height that is not too low or too high.
The importance of the Expanded Core Curriculum
Learners with visual impairments cannot rely on sensory observations; whereas sighted learners use visual encounters throughout their lives to absorb concepts casually or incidentally. The fundamental abilities they require for everyday living at home, at school and in the community must be deliberately taught and incorporated into every facet of their education.
The ECC refers to the concepts and skills that often require specialised instruction for learners who are blind or visually impaired to compensate for decreased opportunities to learn incidentally by observing others (Texas School for the Blind and Visually Impaired, 2014).
The ECC is the body of knowledge and skills that are needed by learners with visual impairments due to their unique disability-specific needs. Learners with visual impairments need the ECC in addition to the core academic curriculum of general education (Allman et al.,2014). The ECC is comprised of nine curriculum components tailored to the needs of people with disabilities that aim to support teachers in aiding students to become as independent as possible to prepare them for employment, promote social engagement and lead the most fulfilling lives possible.
The nine components of the ECC identified by the Perkins School for the Blind (2021) are:
- Compensatory access: Learning how to acquire, share and process information without sight or with severely limited vision.
- Sensory efficiency: Using all senses to access information and communication in an efficient manner.
- Assistive technology: Leveraging technology such as screen-reading software and refreshable braille keyboards to support communication.
- Orientation and mobility: Navigating independently and safely by knowing one’s position relative to other people, objects and places, and getting from place to place safely and efficiently.
- Social interaction: Learning how to behave in social situations without the benefit of nonverbal cues.
- Recreation and leisure: Participating in physical activities and learning how to plan for and incorporate social and leisure time in one’s schedule.
- Independent living: Taking care of oneself as independently as possible, including a broad range of activities such as eating, dressing, money management and household operation.
- Self-determination: Learning how to advocate for one’s own needs.
- Career education: Developing the skills and knowledge needed for success in employment.
Further illustration of the nine ECC components demonstrating differences in approach for primary versus high school learners is presented in Table 1.
Table 1: The progression of ECC skill development from primary to high school (Adapted from: Perkins School for the Blind, 2021).
| ECC component | Primary school learners with visual impairments | High school learners with visual impairments |
|---|---|---|
| Compensatory access | Communicating wants and needs. | Engaging in simple conversation, in person or in writing. If appropriate, learning braille or sign language. |
| Sensory efficiency | Practising tactile and auditory discrimination, localising sound. For students with low vision, practising eye tracking. | Practising listening skills. Understanding their visual impairment and making maximum use of any existing vision. |
| Assistive technology | Using a tablet to express preferences by tapping. Practising swiping and pressing keys, buttons and switches. Using computer software to begin literacy development. | Using a screen reader or magnification software to conduct basic navigation. Using a portable braille notetaking device to create documents. |
| Orientation and mobility | Learning to reach for objects and move toward a target, sound or stimulus. | Practising the correct way to hold a white cane or use other mobility device. Following simple instructions when travelling. |
| Social interaction | Learning to engage in nonverbal communication. Faces those who are speaking. Takes part in healthy reciprocal play. Understands sharing. | Practising self-regulation. Recognising and identifying emotions. Asking appropriate questions. Understanding the importance of listening. |
| Recreation and leisure | Learning how to play independently, how to pretend, how to play with toys and manipulate objects. Engaging in physical play. | Learning how to use one’s time. Listening to music, completing simple projects, using blocks or other toys to make simple constructions. |
| Independent living | Learning to assist in eating, dressing and toileting. Learning to put away toys. | Keeping track of belongings, feeding and dressing oneself, practising hygiene routines. Making their bed and picking up after oneself at home and school. |
| Self-determination | Learning to choose activities and make decisions. | Understanding their visual impairment. Demonstrating a positive sense of self-worth. Identifying and expressing feelings appropriately. |
| Career education | Learning responsibilities like putting away toys. Understanding different roles people play (e.g. firefighter, teacher, parent). | Taking responsibility for actions and working individually or in a group. Understanding the concept of work and able to identify various jobs. |
It is crucial for learners with visual impairments to access the ECC to gain knowledge and skills that will help them make up for their vision loss. The ECC foregrounds the following aspects of curriculum adaptation: (1) content, (2) methods of presenting learning materials, and (3) methods of assessment. Within this framework, new skills and ideas (input), the methods and activities learners with visual impairments use to understand content in their own context (processes), and how these learners show their understanding of what has been learned (outcomes) are acknowledged as key elements in curriculum adaptation.
The other significance of the ECC is that the knowledge the teacher obtains in the course of implementing the ECC will enable them to apply the principles of UDL; that is, to present information and enable the acquisition of information and knowledge in different ways (representation), differentiate the ways in which learners can express what they know (expression), and allow learners to deepen their engagement and interest in the world around them through an array of learning activities that are accessible to learners with different abilities (engagement). Finally, the ECC can also provide clues about how teachers can evaluate the effectiveness of their teaching and approaches to assessment. Effective evaluation and assessment enables teachers to identify needs and strengths of learners with visual impairments. One of the core components of the ECC is the use of assistive technologies to address the needs of learners with visual impairments.
Assistive technologies for learners with visual impairments
The educational setting presents particular difficulties for learners with visual impairments, in that they must be able to fully engage in instruction that frequently includes rich visual content in addition to having access to text-based information across all subject areas. One approach to assist these learners in that process is through assistive technology. In this section, we will engage with some definitions of assistive technology, discuss the classifications of assistive technologies and how to use assistive technology devices with the principles of UDL in mind.

GLOSSARY: Assistive technology devices
The term “assistive technology devices” refers to a variety of tools, gadgets and techniques that enable a student to do a task that they would otherwise be unable to complete or have difficulties completing effectively. It includes anything that helps increase, maintain or improve the independence and learning capabilities of individuals with disabilities (TEDI, 2020a). Assistive technology for individuals with no or low vision works specifically to allow them to interact better with the world around them.
We utilise technology constantly in our daily lives, from basic low-tech things like pencils to high-tech gadgets like computers and phones. Employing assistive technologies in schools and in classrooms is complex. However, if the demands of the learners are properly matched to the environment, the teacher’s knowledge and the resources at hand, it offers excellent chances for learning enrichment (Dalton et al., 2012).
For learners who have low vision, access to assistive technology means that they can have equal access to classroom teaching and learning, resources and opportunities to participate. In many cases, a class’s educational content is primarily visual. Assistive technology aims to minimise learning obstacles and provide alternative ways to understand learning materials.
Classification of assistive technology devices
Assistive technology devices can be classified from low- to high-tech according to the degree of sophistication in the mechanical and electronic parts they are made of and other features such as power source and the knowledge and training the device user must have to optimise its assistance. It is always recommended that no-tech and low-tech solutions be considered before looking at mid-tech and high-tech options. Some experimentation may be required before the best learner-technology match is achieved.
Although low-tech devices may save costs, the main objective is to find the tools that offer learners full access to the curriculum and ensure that they are able to meaningfully engage in teaching and learning activities. Tables 2 provides an overview of the classification of assistive technology devices.
Table 2: Classification of assistive technology devices (Source: TEDI, 2020a)
| Type | Description |
|---|---|
| Low-tech | Low-tech devices are simple devices that have few mechanical parts and do not require a power source. They include adapted spoon handles, adapted pens, canes, non-tipping drinking cups, magnifying glasses and eyeglasses. Limited or less training is needed to use these devices compared to midand high-tech devices. |
| Mid-tech | Mid-tech devices are relatively complicated mechanical devices that may require a power source, but do not contain sophisticated electronic systems. These devices include manual wheelchairs, talking calculators, adapted keyboards and trackballs. The operation of mid-tech devices requires some training and technical knowledge. |
| High-tech | High-tech devices are often computer-based systems that incorporate sophisticated electronics. They are complicated to use and require extensive training, technical knowledge and access to technical support. With their sophisticated electronics, high-tech devices are often much more expensive than other technologies. Examples include speech recognition software, gaze-controlled computers, closed captioning televisions, electric wheelchairs and environmental control units. |
Choosing assistive technology devices
It should be noted that different subjects or fields of study require different types of engagement. This means, that choosing assistive technology devices should be done according to the subject and the needs of the learner in order to empower them to engage in activities across the curriculum. Also, the assistive technologies chosen should reflect learners’ unique strengths and needs, and be appropriate for the activities they need to do to be fully included in the curriculum.
UDL concepts can be applied to ensure that devices are selected and used in a way that best serves learners with visual impairments. The principles of UDL support adaptable methods of using technology that are customised to meet individual needs, rather than adopting a one-sizefits- all approach. By removing obstacles to participation and engagement, UDL aims to expand access to learning for all learners.
Utilising a smartphone can be advantageous in situations where devices are expensive (such as electronic magnifiers). A single device can also serve numerous purposes. Smartphones can become assistive devices thanks to apps that enable magnification, focus, light control; they also enable saving and sharing of content. Voice feedback on tablets can also be used to access teaching content and audio books; and smartwatches that use stimuli like vibration can be used to navigate between locations.
Table 3 provides examples of mid- and high-tech devices that can be employed in relation to specific UDL principles.
Table 3: Practical application of UDL using assistive technology devices (Source: TEDI, 2020b)
| UDL principle | Assistive technology devices |
|---|---|
| Representation | Mid-tech |
| Enabling multiple ways to presenting content |
|
| High Tech | |
|
|
| Expression | Mid-tech |
| Enabling learners to communicate what they know and can do through various means |
|
| High Tech | |
|
|
| Engagement | Mid-tech |
| Enabling the facilitation of choices of learning activities to cater for varied abilities of learners |
|
| High Tech | |
|
The importance of incidental learning
The concept of incidental learning was established in recognition of the vast amount of knowledge that all humans have gained without explicit aim or instruction (Davis & Francis, 2022). It can be defined as learning that occurs as a by-product of another activity; that is, learning that does not require a teacher or instructor to provide targeted teaching. It is usually unplanned and spontaneous and happens unintentionally.
Incidental learning is very important for children with visual impairments. Research shows that approximately children learn more than 80% of what they know through their vision (Lazarus, 2020). Consider what happens when you walk into a room. Normally, you can quickly determine the room’s contents, who is present, what they are doing and, if the room has a window, you can even gauge the weather outside. A lot of what children learn happens fairly instantly and naturally, or incidentally, as they observe how other children and adults interact with their surroundings and mimic those behaviours. Incidental learning is knowledge acquired via daily observation of the people and activities in our environment.
In order for a visually impaired child to understand what other children learn simply by watching others and imitating them, they will require additional explanations, descriptions and repeated encounters. It is not necessary for a child with limited or no vision to be educated all the time, but you should bear in mind that without assistance, they won’t learn about the things they can’t touch. Even with objects that are touchable, they might require extra time to investigate them and your explanation to fully get what they are.
We will now engage with a few practical tips on how to support incidental learning for children with visual impairments.
Include children in sensory activities from a very young age: When your children are very young, include them in household chores. Take your child with you when you need to heat a bottle in the microwave, explain what you are doing, let them feel the icy air coming out of the refrigerator, carry the bottle with you and hear the sound of the microwave. When the bottle is prepared, let them hit the button to open the microwave door while holding your hand underneath their hand so you can touch the heated bottle. Otherwise, if you always give your child a warm bottle, they won’t understand how it got that way.
Connect the unknowns you want to teach your children with the known: Try to connect what you want to teach your infant to something they already understand. For instance, if your child enjoys petting and touching your cat’s legs and ears, compare the lion at the zoo to your cat. Both of them have four legs, ears and fur. However, lions are much larger, cannot be kept as pets and can only be found in zoos or in the wild.
Support your children to do what they like: The more your child interacts, they more they will learn. If your child enjoys eating oranges, let them assist you in choosing them at the grocery store, store them in the refrigerator once you get home and take one out when they want a snack. Explain to your child that orange juice is manufactured from the oranges they like eating when they drink it. To truly assist your child, comprehend where the juice comes from, you may even let them squeeze their own juice.
Use the hand touch strategy to teach your child: Whenever you show your child an object, employ the hand-under-hand strategy. In this approach, your child’s hands are placed on top of yours and they are able to sense your movements. Reaching out and touching something while your child can’t see it and doesn’t know what it is can be frightening for them.
Try to take your child out: Expose your child to environments outside the home. Find places where there are items for them to touch. Botanical gardens, science centres and petting zoos frequently welcome children and allow contact. Don’t be hesitant to enquire if your child can touch if you visit a location where touching isn’t usually permitted as part of the activities.
Conclusion
Vision is one of the senses that provide information about the environment; as such, learners with visual impairments may miss incidental information and important social cues. Visual impairment negatively affects academic engagement if modifications are not made in the curriculum to promote inclusion. Designing classrooms to suit the individual needs of all learners with visual impairments will encourage active participation.
In this chapter, you have learned about teaching strategies for inclusive learning in the context of learners with visual impairments. You have also learned about the importance of the ECC and the range of assistive technology devices for learners with visual impairment. It is hoped that after reading this chapter, you will be able to adjust content in the least restrictive way for learners with visual impairments and employ pedagogies that foster an inclusive environment and encourage active involvement from all learners.
References
Allman, C. B., Lewis, S., & Spungin, S. J. (Eds.). (2014). ECC essentials: Teaching the Expanded Core Curriculum to students with visual impairments. AFB Press. https://www.aph.org/ product/ecc-essentials-teaching-the-expanded-core-curriculum-to-students-with-visualimpairments/
Dalton, E. M., McKenzie, J. A., & Kahonde, C. (2012). The implementation of inclusive education in South Africa: Reflections arising from a workshop for teachers and therapists to introduce Universal Design for Learning. African Journal of Disability, 1(1), Art. #13. https://doi. org/10.4102/ajod.v1i1.13
Davis, B., & Francis, K. (2022). Incidental learning. Discourses on Learning in Education. https:// learningdiscourses.com/discourse/incidental-learning/
Lazarus, R. (2020). Vision and learning difficulties. Optometrists Network. https://www. optometrists.org/vision-therapy/guide-vision-and-learning-difficulties/vision-andlearning- difficulties/
Perkins School for the Blind. (2021). The Expanded Core Curriculum: Incorporating the best learning approaches for your child with blindness or vision impairment. Perkins School for the Blind. https://www.perkins.org/wp-content/uploads/2021/07/ECC_Brochure_2021_digital. pdf
Rose, D. (2000). Universal Design for Learning. Journal of Special Education Technology, 15(2), 56–60. https://doi.org/10.1177/016264340001500208
Stanberry, K., & Raskind, M. H. (n.d.). Assistive technology for kids with learning disabilities: An overview. Reading Rockets. https://www.readingrockets.org/topics/learning-disabilities/ articles/assistive-technology-kids-learning-disabilities-overview
Stratton, J. M. (1990). The principle of least restrictive materials. Journal of Visual Impairment & Blindness, 84, 3–5.
Texas School for the Blind and Visually Impaired. (2014). What is the Expanded Core Curriculum (ECC)? Texas School for the Blind and Visually Impaired. https://www.tsbvi.edu/programs/ecc
Teacher Empowerment for Disability Inclusion. (2020a). Assistive technology for learners who are blind or have low vision: A TEDI short guide. Teacher Empowerment for Disability Inclusion Project. https://health.uct.ac.za/media/395256
Teacher Empowerment for Disability Inclusion. (2020b). Resource guide for teachers of children with visual impairment. Teacher Empowerment for Disability Inclusion Project. https://health. uct.ac.za/media/395207
Copyright 2024 Kofi Nseibo
Licensed under Creative Commons Attribution 4.0 International licence